
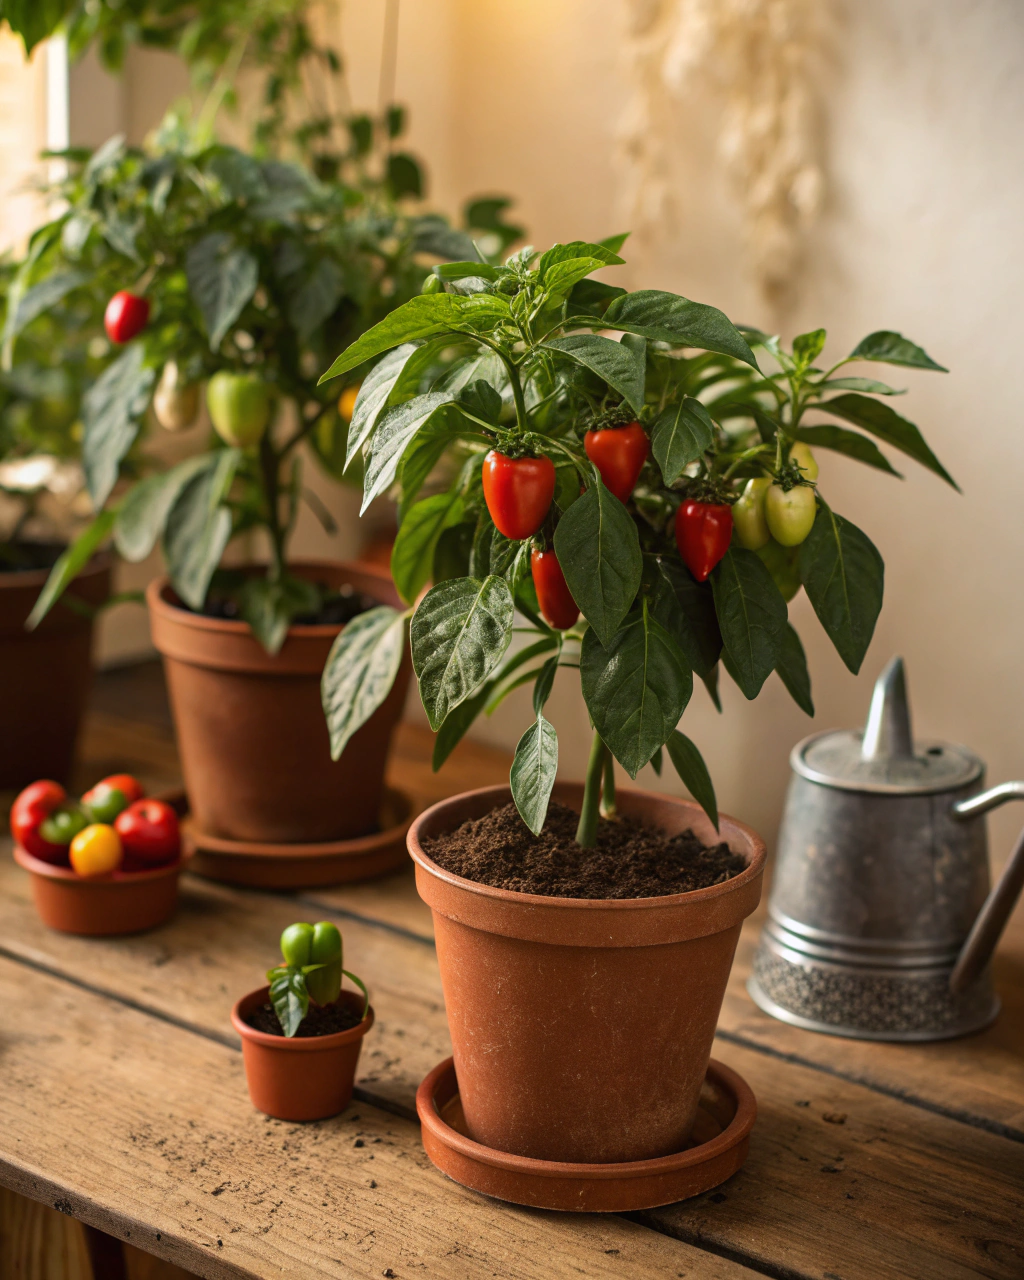
Why Growing Peppers in Small Pots Indoors Is Easier Than You Think
Peppers are vibrant, flavorful, and surprisingly compact—perfect for small pots and indoor gardens. Whether you dream of spicy jalapeños, sweet bells, or colorful mini chilies, growing peppers indoors lets you enjoy fresh harvests year-round. You don’t need a big backyard or fancy equipment; just the right approach and a bit of patience. I’ll guide you step-by-step so you can succeed even on a small balcony or windowsill. From choosing containers to mastering watering, you’ll feel confident and ready. Plus, I’ll share practical fixes for common challenges like pests or space limits. Let’s make your indoor pepper patch a reality—fresh, tasty, and utterly satisfying.
Getting Ready — What You’ll Need
Preparation sets you up for success. Here’s your essentials list:
- Container: minimum 30 cm (12 in) deep with good drainage holes. Clay or ceramic pots work well; clay keeps roots cooler in hot spots, while plastic retains moisture better—choose what fits your environment. (Tip: Saucer trays help avoid mess.)
- Soil mix: 70% loam or good-quality potting soil, 20% compost, 10% coarse sand or perlite. This balance ensures nutrients, aeration, and drainage for strong roots.
- Fertilizer: balanced liquid fertilizer with low nitrogen (e.g., 5-10-10 ratio) applied every 3–4 weeks for steady growth and fruit development.
- Light: bright, direct sunlight for at least 6–8 hours daily. South-facing windows are ideal; consider grow lights if natural light is limited.
- Seeds or seedlings: choose compact varieties—‘Hungarian Wax,’ ‘Mini Bell,’ or ‘Cayenne’ all thrive in pots.
- Tools: small trowel, watering can with fine spout, spray bottle for humidity, and pruning scissors.
- (Optional) Mulch material: straw or dried leaves to retain moisture.
If you’re on a budget, recycled containers with drainage holes and homemade compost work well. Use coarse sand from garden centers or gently crushed eggshells if perlite isn’t available. The key: breathable soil and steady nutrients.
Step-by-Step — How to Grow Peppers in Pots
1. Preparing Your Pot
Start by thoroughly cleaning your pot with warm soapy water, then rinse well. This prevents disease buildup from previous plants. Place a 2–3 cm (1 inch) drainage layer of small stones or broken pottery bits at the bottom—this stops the roots from sitting in water and rotting.
Next, mix your soil components: 70% loam or potting soil, 20% compost, and 10% coarse sand or perlite. This blend offers moisture retention, nutrition, and air pockets around roots, which peppers love. Fill the pot loosely with this mix, aiming for well-aerated soil that feels like a sponge wrung out—not soggy or dry.
Key mistake to avoid: compacting soil too much. Press it gently to settle but keep it loose. Also, never use pots without drainage holes—wet roots suffocate and die fast. Ideal soil pH is between 6.0 and 7.0, so avoid overly acidic or alkaline mixtures.
2. Sowing or Planting
Whether you start indoors with seeds or transfer small seedlings, the next step is crucial. If sowing seeds:
- Plant seeds at a depth of 0.5–1 cm (about ¼ inch); deeper planting delays germination.
- Space seeds about 5 cm (2 inches) apart if sowing directly in the pot, but it’s best to thin later.
- Ideal germination temperature is 22–26°C (72–79°F). Warmth activates the seeds quickly.
- Pro tip: soak seeds for 6–8 hours in lukewarm water before sowing to soften their tough coats and speed sprouting.
After sowing, lightly mist the soil surface and cover with clear plastic or a humidity dome to keep moisture steady. You should see tiny shoots breaking through in 7–14 days.
When seedlings have 2 true leaves, thin to one per pot or transplant carefully to their final container using loose soil. You want roots undisturbed and cozy inside fresh soil.
3. Watering and Sunlight
Peppers need consistent moisture but hate soggy soil. Water deeply so the entire root ball is moist, then let the top 2 cm (¾ inch) of soil dry before watering again. In warm weather, expect to water 2–3 times per week, less frequently in cooler or humid conditions.
Visual cues help: soil should be damp, dark, and crumbly, not wet and heavy. Leaves that start to droop are a late sign—don’t wait that long.
If your indoor air is dry or heating runs constantly, mist leaves daily with water from a spray bottle to maintain humidity and reduce stress.
Peppers thrive in 6–8 hours of bright, direct sunlight daily. If your spot is cloudy or shaded, supplement with LED grow lights placed about 15 cm (6 in) from the plants. Rotate pots weekly so all sides get equal light; this prevents leaning and strengthens stems.
In hotter climates or near strong heaters, protect roots by choosing clay pots, grouping plants together to share humidity, or providing afternoon shade with a light fabric cover.
4. Feeding and Maintenance
Fertilize peppers every 3–4 weeks using a balanced, low-nitrogen liquid feed (like 5-10-10). Too much nitrogen encourages leaves over fruit, so steady but measured feeding is key for tasty peppers.
Thin crowded seedlings so each has 15–20 cm (6–8 inches) between plants—this gives space for air and light to reach every leaf and reduces disease risk.
Prune early shoots below the first cluster of flowers. This redirects energy to fruit development and sturdier branching.
Regularly check soil texture and aeration with your fingers. If soil feels compacted, gently loosen with a small fork to boost airflow and drainage.
Watch leaves closely. Pale or curling leaves signal nutrient imbalance or watering issues.
“The secret is not more work — it’s regular care and observation.” This is one of the most effective lessons I’ve learned tending peppers indoors. Daily glance, small adjustments.
5. Troubleshooting While They Grow
- Yellow leaves: Often excess nitrogen or overwatering. Fix by using fertilizer higher in phosphorus and check drainage.
- Stunted growth: Not enough light or root crowding. Move to a sunnier spot and thin seedlings.
- Soil stays soggy: Check holes aren’t blocked; add sand for better drainage.
- Pests like aphids or spider mites: Spray with water or mild insecticidal soap early. Avoid chemical sprays indoors.
- Blossom drop: Caused by heat spikes above 30°C (86°F) or inconsistent watering. Keep stable conditions and consistent moisture.
6. Harvesting
Peppers generally take 70–90 days from sowing to reach maturity. Color changes signal readiness: red, yellow, orange, or deep green depends on variety. Fruit should feel firm, glossy, and have a slight give when gently pressed.
To harvest, use sharp scissors or snip peppers off with the stem attached—this protects the plant and promotes more fruit. Avoid pulling, which can damage branches.
For better flavor, reduce watering during the final week to concentrate sugars and boost sweetness.
Store freshly picked peppers at 4–7°C (39–45°F) in a dark, ventilated spot for up to 2 weeks. Avoid humidity over 85%, or they’ll rot quickly.
To preserve extra harvest, try drying, pickling, or freezing. Each method locks in layers of flavor for use through colder months.
Extra Tips for Perfect Results
- Companion plants: Basil (repels aphids), marigold (deters nematodes), nasturtium (attracts beneficial insects), and chives (help deter pests).
- Rotate pots every season to avoid soil fatigue and nutrient depletion.
- Mulch with straw or dried leaves to retain humidity and moderate soil temperature.
- Use rainwater if possible—tap water can build up salts and harden soil over time.
- In windy indoor spaces, group pots together for shared moisture and stability.
- Under very strong sun, provide a thin fabric shade during midday (12–3 pm) to prevent leaf scorch.
Common Mistakes and How to Fix Them
- Overwatering: Roots stay soft and rot. Fix: Allow the top 2 cm (¾ inch) of soil to dry out fully before watering again.
- Weak growth: Too little light. Fix: Move pot to a sunnier window or add supplemental lighting.
- Yellow leaves: Excess nitrogen from too-frequent feeding. Fix: Switch to fertilizer with higher phosphorus and reduce feeding frequency.
- Poor germination: Seeds planted too deep. Fix: Sow at a shallow depth of 0.5–1 cm (¼ inch).
- Misshapen roots: Compacted soil blocks airflow. Fix: Mix in coarse sand or perlite and avoid heavy pressing when filling pots.
Harvest and Storage
Harvest peppers gently by clipping the stem with pruning scissors or a sharp knife. Pulling risks breaking branches and stunting further fruiting. Peppers should be bright and firm, with smooth skins that sometimes give a faint snap when gently squeezed. The aroma is fresh, slightly herbal, and sweet-spicy depending on variety.
Store your harvest in a cool, dark, and ventilated place around 4–7°C (39–45°F). Peppers keep best under moderate humidity; avoid sealing in plastic bags for long periods to prevent rot. Under optimal conditions, they last up to 2 weeks.
To preserve longer, dry thin slices on racks indoors or use a dehydrator. Pickling peppers in vinegar with spices extends flavor for months. Alternatively, chop and freeze to add fresh taste directly to soups or sauces.
Don’t forget to save seeds from your healthiest, fully ripe peppers for next season. Dry seeds completely and store in an airtight container at room temperature, away from sunlight.
What Success Looks Like
When you pull your first firm, fragrant pepper from the pot, the smooth texture and vibrant color will reward every bit of care you invested. Expect yields of 1–2 kg (2–4 lb) of peppers per 30 cm (12 in) pot—more if conditions are ideal. The spicy warmth or sweet crunch of homegrown peppers is unmatched from store-bought.
Success feels quiet but profound. It’s the steady drip of watering can, the sun-warmed leaves you brush with fingertips, and the scent of earth and spice blending in your indoor garden. Day by day, you learn the rhythms and needs of your peppers. This connection is the true harvest.
Mini Recap — Your Success Checklist
- Pot depth: minimum 30 cm (12 inches).
- Soil mix: 70% loam, 20% compost, 10% sand/perlite.
- Watering: 2–3 times per week, let top 2 cm dry out between waterings.
- Sunlight: 6–8 hours daily; supplement with grow lights if needed.
- Fertilizer: low nitrogen, every 3–4 weeks.
- Harvest: 70–90 days after sowing; look for vibrant color, firmness.
Closing Reflection
Growing peppers indoors isn’t about perfection; it’s a living, evolving practice shaped by your hands and each season’s light. Every plant teaches you a little more about patience and attentiveness. Small consistent acts—checking soil moisture, giving the right light, pruning gently—bring you closer to nature’s rhythms. Be patient, stay curious, and most of all, enjoy the process. That’s what makes you a gardener.

Hi there — I’m Kyla, the creator behind Kyla Garden Tips 🌿
I’ve always been passionate about plants, flowers, and the simple joy that comes from growing something beautiful. What started as a small balcony garden has turned into a love for helping others create their own green spaces — no matter how big or small.