
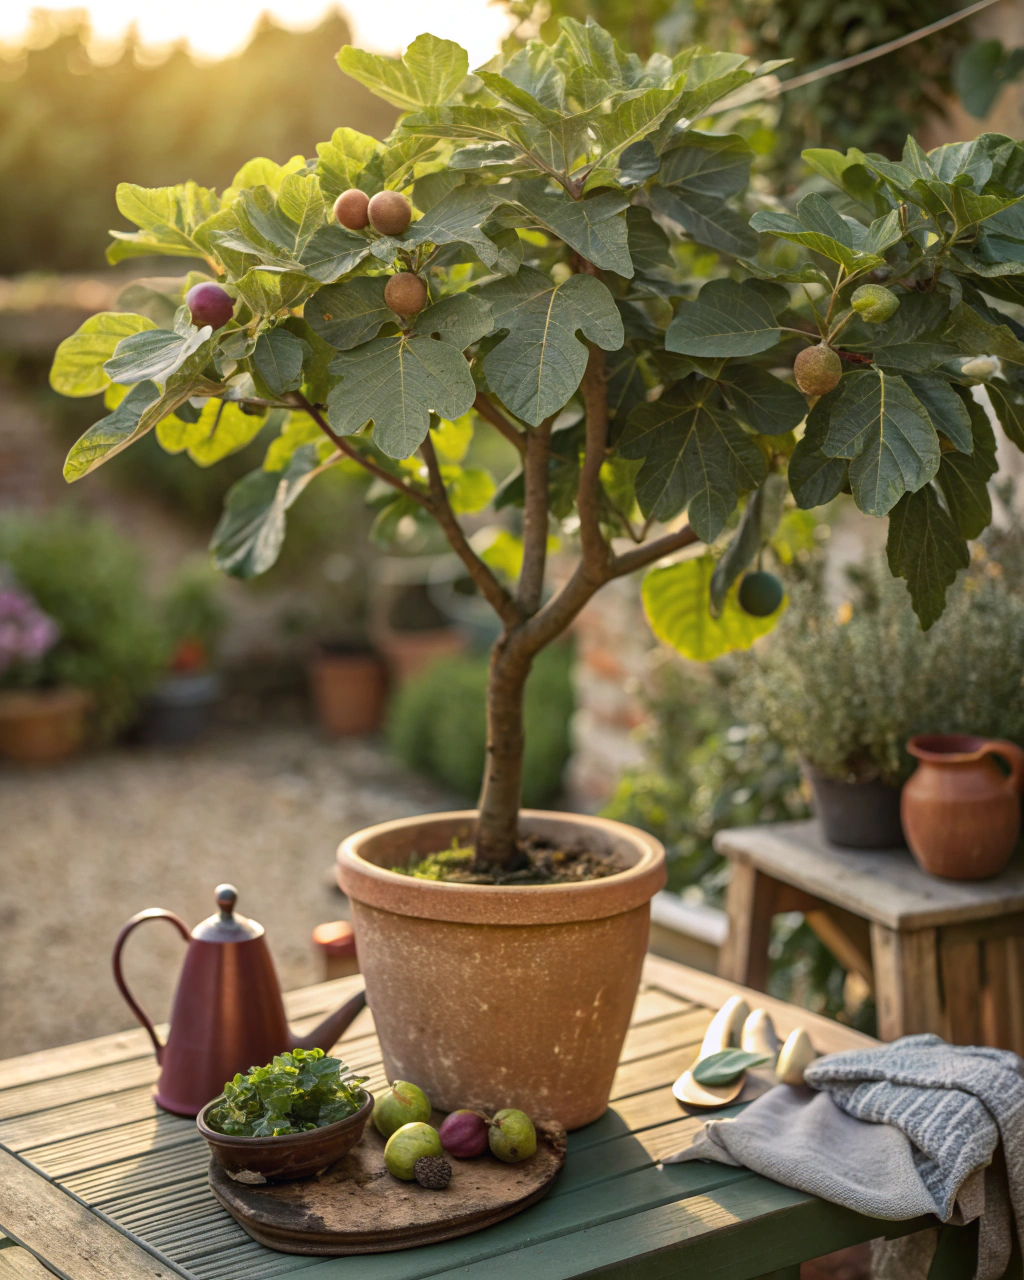
Why Grow Figs in Pots?
Figs are a delight to grow, especially if you crave fresh, sweet summer fruit right at your doorstep. Even if your space is limited to a balcony or a small patio, you can successfully cultivate figs in pots. Their warm, honeyed flavor and soft texture make all the care worthwhile. Plus, figs thrive in containers because you can control their soil, watering, and sunlight with ease. I’ll guide you through simple, practical steps—from picking the right pot to harvesting delicious figs—that any gardener can follow. You’ll feel confident and inspired, knowing you have the knowledge to tackle common challenges and celebrate a sweet summer harvest.
Getting Ready — What You’ll Need
Before you begin, gather these essentials to set your fig up for success:
- Container: At least 40–50 cm (16–20 inches) in diameter and 30–40 cm (12–16 inches) deep to give roots space to grow. Use plastic or glazed ceramic pots to retain moisture; clay pots are a good choice if your climate is very hot (they help keep roots cool).
- Soil mix: A balanced, well-draining blend with approximately 70% high-quality loam, 20% compost for nutrients, and 10% coarse sand or perlite to enhance drainage and airflow.
- Fig variety: Choose container-friendly types like ‘Petite Negra,’ ‘Brown Turkey,’ or ‘Desert King’—all prolific and adaptable.
- Fertilizer: Balanced, low-nitrogen fertilizer—look for an N-P-K ratio around 3-10-10, or use organic options like fish emulsion or seaweed extract.
- Watering tools: A watering can with a fine rose head to avoid soil disturbance.
- Light source: At least 6–8 hours of direct sunlight daily; if indoors, a south-facing window or supplemental grow light.
- Pruning shears or scissors: For maintenance and harvest.
- Gloves: To protect hands when pruning.
Pro tip: If you’re on a budget or want to be eco-friendly, repurpose old pots, use homemade compost, and collect rainwater for watering.
Step-by-Step — How to Grow Figs in Pots
1. Preparing Your Pot
Start by thoroughly cleaning your pot with warm water and mild soap to eliminate any pathogens that might harm the young plant. Ensure it has at least 3–4 drainage holes at the bottom. Drainage is critical; your fig’s roots must never sit in stagnant water. First, lay down a 3–5 cm (1–2 inch) drainage layer of broken pottery shards, gravel, or clean coarse sand to prevent clogging soil from blocking holes.
Next, prepare your soil mix—combine 70% loam for structure and nutrients, 20% compost for organic matter, and 10% coarse sand or perlite to encourage airflow and quick drainage. Fill the pot so the soil reaches about 2.5 cm (1 inch) below the rim, leaving room for watering. The soil should feel moist, like a sponge gently wrung out—wet but not soggy. Avoid compacting the soil; pack it lightly to prevent roots from struggling while keeping enough air around them.
One critical mistake to avoid is planting your fig in heavy, clayey soil that retains water. That suffocates roots and invites rot. Also, make sure the pH of your soil is slightly acidic to neutral—between 6.0 and 6.5—which suits fig trees best.
2. Sowing or Planting
While figs can be grown from seed, most container growers opt for young plants or hardwood cuttings for reliable results. If you use hardwood cuttings, choose firm, pencil-thick branches about 20–25 cm (8–10 inches) long from dormant, healthy fig trees.
Plant your cutting deep enough to cover at least two-thirds of its length—approximately 15–20 cm (6–8 inches) into the soil—and gently firm the soil around it. Space isn’t a big concern in a pot, but if you have several pots, keep them at least 40 cm (16 inches) apart.
For fig seeds, sprinkle them thinly on the surface of moist soil, then cover lightly with a thin layer of sand or soil to a depth of no more than 1 cm (0.4 inches). Keep temperatures warm—between 21–24°C (70–75°F)—and maintain humidity by covering with plastic wrap or a propagator lid.
When your fig is planted correctly, the soil will feel firm yet spongy under your fingers, and the cutting should stand upright without wobbling. Pro tip: Soaking cuttings overnight in water before planting improves root development dramatically.
3. Watering and Sunlight
Watering your fig requires balance. After planting, water deeply until moisture seeps from the drainage holes. In hot weather, that means watering about 2–3 times per week. Always check your soil by touch—the top 2 cm (0.8 inches) should feel dry before watering again. Overwatering can suffocate roots; underwatering stresses the plant and weakens fruit production. A good sign of thirst is when new shoots begin to wilt or curl.
Figs thrive with full sun. Place your pot where it receives a minimum of 6–8 hours of direct sunlight daily. If you’re in a cloudy zone, brighten the space with reflective surfaces like white walls or mirrors. You can supplement with a grow light tuned to the red and blue spectrum if natural light is limited (keep the light on for 12–14 hours daily).
If you’re in a hot, dry, or windy climate, group your pots close together. This microclimate helps reduce water loss and offers some wind protection. Adding a thin layer of mulch on top of the soil (straw or dried leaves) keeps moisture in. During peak heat at midday, your pots might benefit from a light shade cloth to protect leaves and roots from scorching.
4. Feeding and Maintenance
Figs are moderately hungry feeders, especially in containers. Start feeding your tree when new growth starts in spring, using a balanced fertilizer with a slightly higher phosphorus and potassium ratio compared to nitrogen (for example, 3-10-10) every 3–4 weeks. Organic feeds such as diluted fish emulsion or liquid seaweed work well and reduce the risk of burning roots.
Prune your fig tree lightly during the dormant season to shape the plant and improve air circulation—not more than 20-25% of branches. Remove any dead or crossing branches. You can also pinch new shoots during early summer to encourage fruiting branches.
Keep an eye on soil aeration. If the soil feels compacted, replace the top 5 cm or gently scratch the surface to let air in. If the tree shows droopy leaves or sudden yellowing, check for overwatering or nutrient deficiency. Remember the wise gardener’s saying: “The secret is not more work — it’s regular care and observation.”
5. Troubleshooting While They Grow
It’s natural to encounter a few hiccups. Here’s how to read your fig’s signals and respond quickly:
- Yellow leaves: Usually a sign of excess nitrogen or poor drainage. Flush the soil with water to remove salt buildup and switch to fertilizer with more phosphorus—this promotes fruits, not just leaves.
- Stunted growth: Often caused by insufficient light or a pot that’s too small. Move your fig to a sunnier spot and consider repotting into a larger container with fresh soil.
- Wilting or drooping leaves: Check soil moisture gently. If the soil is dry 2 cm deep, increase watering frequency; if soggy, reduce watering and check drainage.
- Pests: Watch for aphids, scale insects, or spider mites. Spray with insecticidal soap or neem oil every 7–10 days until pest-free. Keep leaves dry and prune dense growth to deter pests.
- Leaf drop: Stress from transplanting or environmental changes. Give your fig consistent care and avoid sudden moves.
6. Harvesting
Figs are ready to harvest about 70–90 days after flowering, usually in mid to late summer. Watch for these signs: the fruit will swell and soften, the skin will change from green to a deep purple, brown, or yellow shade—depending on the variety—and the scent becomes sweet and slightly musky.
Gently lift the fig with a subtle twist—ripe fruit detaches easily without tugging. If it resists, give it a few more days. Ripe figs should feel soft but not mushy, almost like a ripe peach. If you nibble, the flesh reveals a rich, caramel-like sweetness beneath the smooth skin.
To enhance flavor, stop watering about 7 days before harvest. This slight stress concentrates sugars and results in more intense sweetness. Handle all fruit carefully—fig skins bruise easily.
Store harvested figs in a dark, cool place between 4–7°C (39–45°F) with high humidity and eat within 1–2 weeks. For longer preservation, consider drying, freezing, or pickling.
Extra Tips for Perfect Results
- Grow companion plants such as basil (repels pests), marigold (deters nematodes), nasturtium (attracts beneficial insects), and lavender (improves pollination).
- Rotate your fig pots each season to prevent soil fatigue and reduce soil-borne diseases.
- Apply mulch with straw, dried leaves, or bark to keep humidity steady and reduce soil temperature fluctuations.
- Use collected rainwater for watering—tap water can increase soil alkalinity over time and harm your fig’s growth.
- In windy or exposed places, cluster your pots together for mutual windbreak and better moisture retention.
- During extreme heat, install a thin fabric shade from midday to afternoon; this protects leaves without robbing sunlight.
Common Mistakes and How to Fix Them
- Overwatering: Roots stay soft and rot quickly. Fix by letting the top 2 cm (0.8 inches) of soil dry before watering again and improve drainage.
- Weak growth: Too little sunlight usually the culprit. Move your pot to a location with more direct sun—aim for 6–8 hours daily.
- Yellow leaves: Indicates too much nitrogen fertilizer. Switch to a feed higher in phosphorus and potassium to encourage fruiting.
- Poor germination: Seeds planted too deep—keep planting depth between 0.5 and 1 cm (0.2 to 0.4 inches).
- Misshapen roots: Soil is compacted or poorly aerated. Incorporate coarse sand or perlite to the mix for air pockets.
Harvest and Storage
When harvesting, always handle your fig plant gently to avoid damaging roots or branches—support the branch with one hand while twisting the fruit with the other. Use sharp, clean pruning shears to snip fruit that’s difficult to pull. Store fresh figs in a dark place at 4–7°C (39–45°F), in a breathable container or paper bag to maintain moisture without sogginess. Consume within 7–14 days for best flavor.
If you have a surplus, you can preserve figs by drying them in the sun for 4–6 days until leathery but pliable, freezing them whole or halved in airtight bags, or pickling in spiced vinegar solutions—each method captures different flavor profiles.
Don’t forget to save seeds! Scoop fig pulp onto paper towels, dry for 2–3 days, then store in a cool, dry place until next planting season. While seed-grown figs take longer to fruit, it’s a rewarding long-term project.
What Success Looks Like
Picture this: you grasp a plump fig between your fingers, its skin warm from the sun, soft yet firm. As you pull, it detaches with a gentle pop, releasing a sweet, honeyed scent that fills the air. That first bite reveals a tender, jammy interior that melts in your mouth—proof that attentive care transforms simple soil and sun into summer’s sweetest reward.
Expect a yield of about 1–2 kg (2–4 lb) of fruit per container each season, with well-maintained trees producing consistently after their third year. Success grows from steady hands, regular observation, and a genuine connection to nature’s pace. Embrace every stage from sowing to harvest.
Mini Recap — Your Success Checklist
- Pot depth: At least 30 cm (12 in).
- Soil mix: 70% loam, 20% compost, 10% sand.
- Watering: Approximately 2–3 times per week, adjust by soil touch.
- Sunlight: Ideal is 6–8 hours per day.
- Fertilizer: Every 3–4 weeks, low nitrogen regimen.
- Harvest: Typically 70–90 days after flowering.
Closing Reflection
Growing figs in pots is a journey of patience and attentive care. Remember, success isn’t about perfection; it’s the series of small, consistent actions that build thriving plants over time. Every plant you grow teaches you something new—how to read soil, tune your watering, and respond to nature’s signals. Don’t rush this process. Watch closely, adjust as needed, and savor each warm, fragrant fig—these are the moments that transform you from a gardener into a steward of the earth.

Hi there — I’m Kyla, the creator behind Kyla Garden Tips 🌿
I’ve always been passionate about plants, flowers, and the simple joy that comes from growing something beautiful. What started as a small balcony garden has turned into a love for helping others create their own green spaces — no matter how big or small.