
“`html
Carrots are one of the most rewarding root vegetables you can grow — they’re sweet, crisp, and packed full of nutrients. What’s more, you don’t need a vast garden to enjoy them; even a small balcony or patio can host a thriving carrot crop in pots. This guide is designed to walk you through every step, lending you the confidence and know-how to succeed. Whether you face limited space, tricky soil, or pesky pests, you’ll find clear, practical solutions here that guarantee a tasty, vibrant harvest.
Getting Ready — What You’ll Need
Before you dig in—literally—make sure you have the right setup. Here’s your essential shopping list and why each item matters:
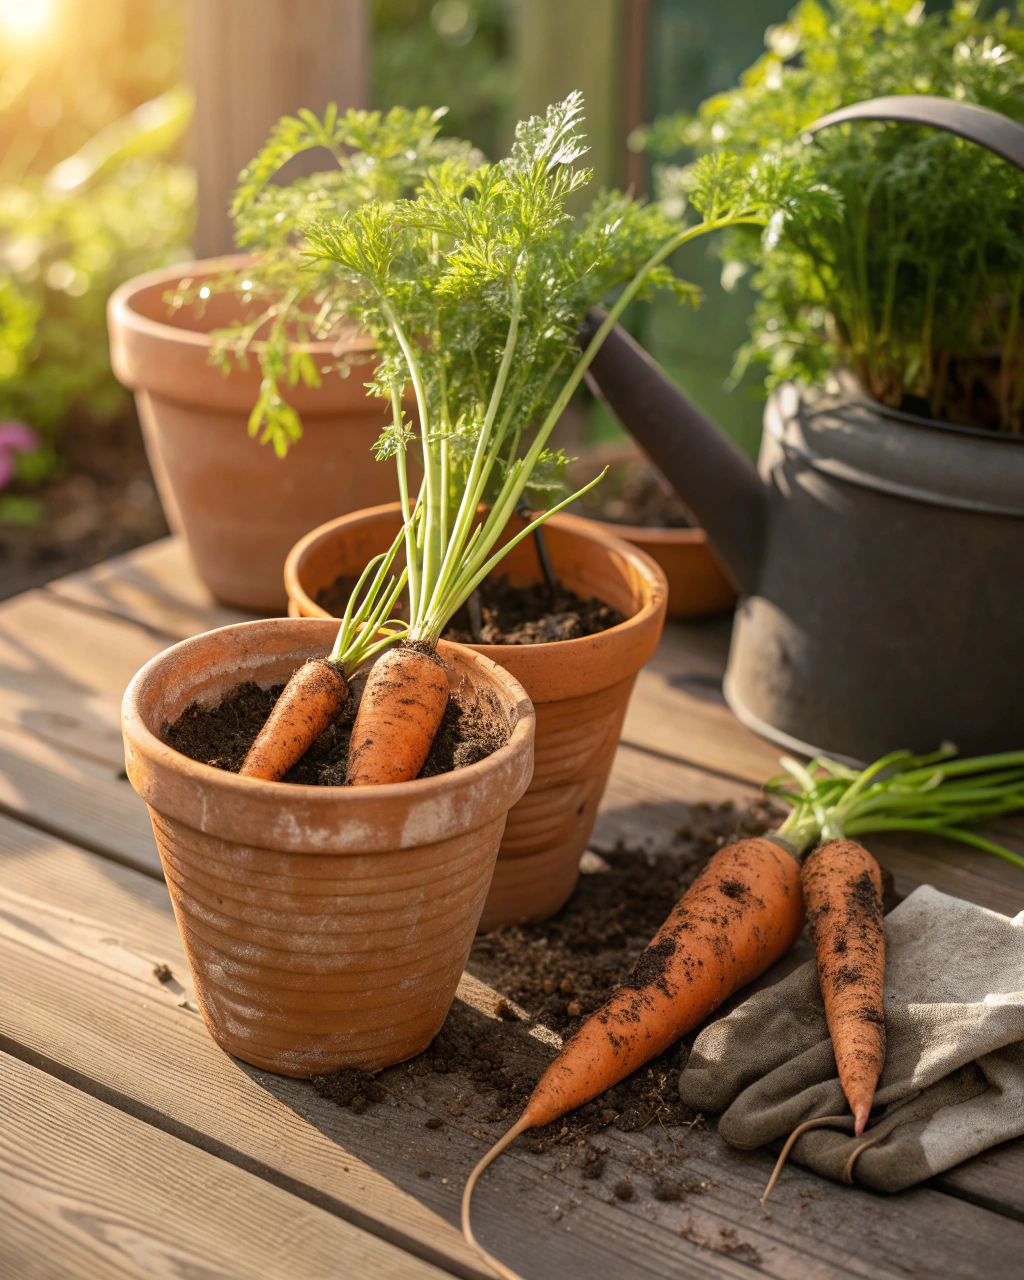
- Container: You’ll need a pot at least 30 cm (12 in) deep to give carrot roots room to grow straight and long. Width should be no less than 20-25 cm (8-10 in) so you can sow multiple carrots without crowding. (If your space is tight, window boxes or troughs work well too.)
- Drainage: Your pot must have drainage holes. Without proper drainage, roots rot easily and the soil stays too wet.
- Soil mix: Use a well-draining, loose mix. A good recipe is 70% loamy soil or topsoil, 20% mature organic compost, and 10% coarse sand or perlite. This mix balances moisture retention with air circulation, crucial for healthy roots.
- Seeds: Choose carrot varieties suited for containers. Short-root types like ‘Paris Market’ or ‘Thumbelina’, or small Nantes varieties, work best. These mature in 70–90 days and won’t get woody.
- Fertilizer: A balanced, low nitrogen fertilizer or a liquid seaweed feed (helpful for root crops) applied every 3–4 weeks. Avoid high nitrogen; it encourages leafy tops but weak roots.
- Light: Carrots require 6–8 hours of direct sunlight daily. Make sure your spot isn’t too shaded.
- Tools: A small trowel or hand fork for preparing soil, a watering can with a fine rose spout to avoid washing out seeds, and a soft rake or your fingers for thinning seedlings.
(Eco-tip: Repurpose old containers, clean thoroughly with mild vinegar solution, and use homemade compost or leaf mold in your soil mix.)
Step-by-Step — How to Grow Carrots in Pots
1. Preparing Your Pot
Start by washing your container with warm, soapy water to remove any pathogens from previous plants. Check that drainage holes are clear. If they’re small or few, drill extra holes to improve water flow.
Next, create a 2-3 cm (1 in) drainage layer at the bottom with broken pottery shards, gravel, or coarse sand. This prevents waterlogging and encourages healthy roots.
Fill your pot with your pre-mixed soil blend—remember: 70% loam, 20% compost, and 10% sand. Aim for soil that feels like a squeezed-out sponge: moist but not soggy, holding together without clumping.
One common misstep is packing the soil too tightly. Carrot roots need loose soil to push through. If your soil feels hard or brick-like, loosen it with a fork and add more sand or perlite.
2. Sowing or Planting
Carrot seeds are tiny and best sown directly in the pot. Sow at a depth of 0.5–1 cm (1/4 in). Plant seeds about 2–3 cm (1 in) apart to allow room to grow (you’ll thin later). The soil temperature should be between 16–21°C (60–70°F) for consistent germination.
You can pre-soak seeds in lukewarm water for 4–6 hours to speed up germination, but don’t leave them soaking overnight or they may rot.
When it’s right, the soil surface feels evenly moist and cool to the touch. Seeds should take around 10–14 days to sprout, so be patient.
Pro tip: Cover your pot loosely with a clear plastic dome or plastic wrap to retain humidity until seedlings emerge—be sure to ventilate daily to prevent mold.
3. Watering and Sunlight
Watering carrots in pots is a balance. You want the soil consistently moist but not soggy. Water deeply—until you feel moisture at the pot base—about 2–3 times per week in warm weather. Early morning watering minimizes evaporation and fungal problems.
Visual cue: the top 1–2 cm (half an inch) of soil should feel just dry when you water again. If the soil stays wet for days, reduce watering or improve drainage.
Carrots need 6–8 hours of sunlight daily. If your site is too shady, move pots to a sunnier location or supplement with grow lights. In hotter climates, be mindful of wilting midday sun. Grouping pots together or using mulch can help retain moisture. If temperatures exceed 29°C (85°F), consider partial shade during the afternoon.
4. Feeding and Maintenance
Feed carrots every 3–4 weeks using a liquid seaweed fertilizer or a low nitrogen balanced fertilizer. High nitrogen promotes lush leafy tops but poor roots.
Thin seedlings when they reach about 5 cm (2 in) tall, leaving the strongest plants about 5 cm (2 in) apart so roots have space to grow fully.
Loosen the soil gently with a small fork or your fingers near young plants to maintain aeration. Compacted soil reduces oxygen and stunts root growth.
“The secret is not more work — it’s regular care and observation.” Take a moment every few days to check your carrots and their soil conditions. It makes all the difference.
5. Troubleshooting While They Grow
- If leaves yellow and growth slows, you may have excess nitrogen. Switch to a phosphorus-rich feed or add compost tea.
- Slow or uneven germination? Check your seed depth doesn’t exceed 1 cm (1/2 in). If soil crusts, gently scratch the surface and keep moist.
- Stunted or forked roots often mean compacted soil or insufficient depth. Always use loose soil and a deep enough pot.
- If you notice wilting or leaf curling, check moisture levels—both overwatering and underwatering can cause stress.
- Carrot flies can be an issue. Cover pots with fine mesh or cling film with holes for air to keep pests off.
6. Harvesting
Carrots are ready to harvest when they’ve reached typical maturity times, usually between 70–90 days, depending on the variety. Check by gently brushing aside soil near the top of a root—you want a rich orange color and firm texture.
Before pulling, reduce watering for the last week to concentrate sugars and intensify flavor. When you harvest, grab each carrot by the base of the foliage and pull firmly but gently—you want a clean snap, not a broken root.
If you have trouble pulling, use a hand fork to loosen soil around the root first to avoid damage.
Store harvested carrots in a cool, dark, and humid place around 4–7°C (39–45°F), ideally wrapped in damp cloth or sand, for up to 2 weeks.
Extra Tips for Perfect Results
- Companion plants: Planting onions, chives, or rosemary nearby helps deter carrot flies. Lettuce and radishes are also good neighbors—they don’t compete deeply and help shade soil.
- Rotate pots seasonally to avoid soil fatigue and disease buildup.
- Mulch the pot surface with dry straw or leaves to keep humidity consistent and reduce soil temperature swings.
- Use rainwater whenever possible — tap water tends to have salts that harden soil over time.
- In windy areas, place pots close together for shared humidity and stability.
- Where the sun gets very hot, drape a thin fabric shade over pots during midday to prevent overheating.
Common Mistakes and How to Fix Them
- Overwatering: Results in soft, rotten roots. Remedy: let the top 2 cm (3/4 in) dry out fully between watering.
- Weak growth: Often caused by too little sun. Move pots to ensure 6–8 hours of direct sunlight daily.
- Yellow leaves: Caused by excess nitrogen fertilizer. Switch to low nitrogen formulas with more phosphorus.
- Poor germination: Seeds sown too deep or soil crusting. Sow at 0.5–1 cm (1/4–1/2 in) depth and gently roughen soil surface.
- Misshapen roots: Typically due to compacted or rocky soil. Add coarse sand or perlite when mixing soil to encourage straight roots.
Harvest and Storage
When harvesting, avoid twisting carrots; pull them straight up to prevent damage to the root or stem. After cleaning, trim tops to about 2 cm (3/4 in) to reduce moisture loss.
Store carrots at a temperature of 4–7°C (39–45°F) with high humidity (85-95%). Keep them in perforated plastic bags or covered with damp sand in a cool, dark area. Under these conditions, carrots can last up to 2 weeks.
For longer preservation, consider pickling or freezing thinly sliced carrots blanched briefly in boiling water. You can also dry carrot strips for use in soups and stews.
Save some carrots to mature into seed plants for next year. Allow some plants to flower, then collect seed umbels once they dry on the stalk. Store seeds in a cool, dry place away from direct sunlight.
What Success Looks Like
When you pull your first firm, fragrant carrot from the pot, a crisp snap confirms the root is perfectly mature. The rich, sweet scent rising as you brush away soil proves your care has paid off. In a 30 cm deep by 25 cm wide pot, you can expect an average yield of about 1–2 kg (2–4 lb) of fresh carrots per growing cycle.
Success isn’t just the harvest, though. It’s the connection you feel watching every small leaf unfurl and every root thicken beneath your fingertips. Consistency and gentle observation are your best tools. Gardening teaches you patience, and with carrots, patience tastes sweetest.
Mini Recap — Your Success Checklist
- Pot depth: 30 cm (12 in) minimum for root development.
- Soil mix: 70% loam, 20% compost, 10% coarse sand or perlite for drainage.
- Watering: Deeply 2–3 times per week; adjust by soil moisture and touch.
- Sunlight: 6–8 hours of full sun daily for vibrant growth.
- Fertilizer: Use low nitrogen feeds every 3–4 weeks to encourage roots.
- Harvest: Between 70 and 90 days, depending on variety and conditions.
Closing Reflection
Remember, growing carrots in pots is less about perfection and more about small, consistent acts of care. Each seed you sow and every watering you do builds your expertise. Gardening isn’t about rushing; it’s about watching, adjusting, and savoring the quiet moments outdoors. Every plant you grow teaches you something new. With this guide in your hands, you’re ready not just to grow carrots but to join a timeless connection with nature. That’s the true harvest.
“`

Hi there — I’m Kyla, the creator behind Kyla Garden Tips 🌿
I’ve always been passionate about plants, flowers, and the simple joy that comes from growing something beautiful. What started as a small balcony garden has turned into a love for helping others create their own green spaces — no matter how big or small.