
Why Grow Arugula in Pots? Your Peppery Salad Secret
Arugula, with its delightful peppery bite and tender leaves, is a must-have for fresh, vibrant salads. Growing it in pots is perfect whether your garden is a sunny balcony, a small patio, or even a windowsill. You don’t need acres of land to enjoy crisp, homegrown greens bursting with flavor. Plus, you control the soil, water, and light, giving you an edge against pests and poor yields. With just a bit of space and the right care, you’ll harvest fresh leaves in as little as 70 days. Let me guide you with clear, practical steps that turn simple pots into your personal arugula oasis.
Getting Ready — What You’ll Need
Before you start, gather these essentials to give your arugula the best possible environment:
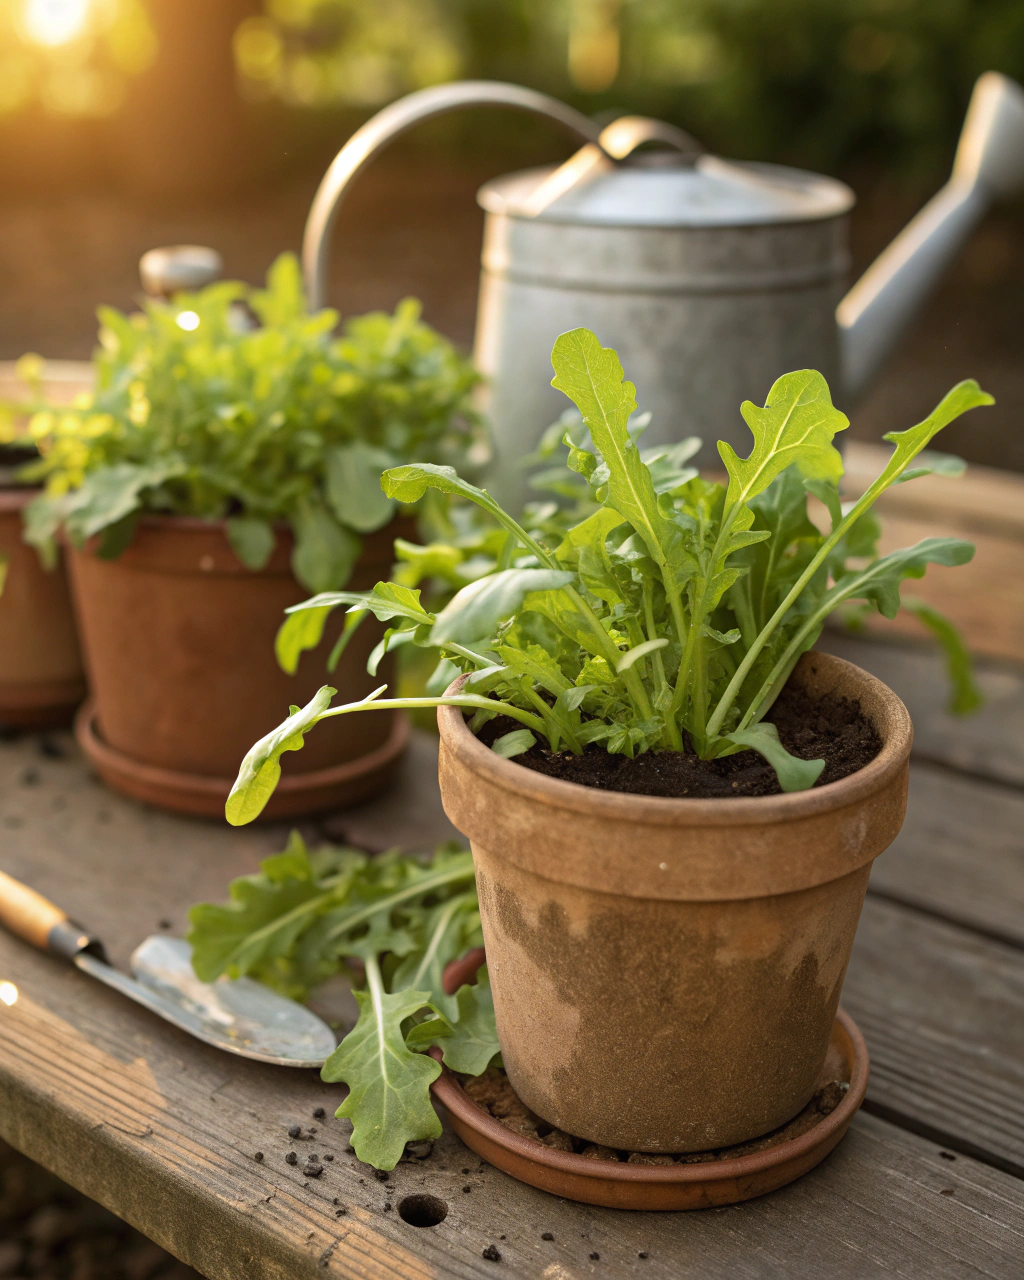
- Container: Choose pots at least 30 cm (12 in) deep. This depth lets roots develop without restriction. Width of 20–25 cm (8–10 in) or more allows healthy spacing. Consider clay pots for hot climates to keep roots cool (plastic pots warm up faster but retain moisture).
- Soil mix: Use a blend of 70% loam (for water retention), 20% compost (for nutrients), and 10% coarse sand or perlite (for aeration). Well-draining soil is critical—arugula hates soggy roots.
- Seeds: Pick varieties like ‘Rocket,’ ‘Sylvetta,’ or ‘Astro’ for their proven peppery flavor and fast growth.
- Fertilizer: A balanced, low-nitrogen liquid fertilizer or organic compost tea, applied every 3–4 weeks. Nitrogen supports leaf growth but too much can dull the taste.
- Light: Your plants will need about 6–8 hours of direct sunlight daily. A south-facing balcony or window box works well.
- Tools: Basic toolkit—small trowel, watering can with a fine rose, and gloves for handling soil.
- Water source: Rainwater is ideal (tap water can build salts in soil). If unavailable, use filtered or dechlorinated water to keep microbiota happy.
(If you’re on a tight budget, recycled containers with drainage holes work fine, just be sure to clean them thoroughly.)
Read Next: Mustard Greens in Pots: Fast-Growing and Flavorful
Step-by-Step — How to Grow in Pots
1. Preparing Your Pot
Start by washing your container with hot water and a bit of mild soap to remove any pathogens or residues. Make sure it has several drainage holes at the bottom. Without proper drainage, roots will sit in water and rot, ruining your crop. Add a drainage layer of about 2–3 cm (1 in) of small gravel or broken pottery shards to prevent soil from blocking holes and keep excess water clear.
Next, mix your soil components thoroughly—loam, compost, and sand or perlite—so the substrate is light and aerated. Fill your pot up to about 3 cm (1 in) below the rim to prevent overflow when watering. The soil should feel like a wrung-out sponge: moist but not soggy. Avoid compacting the soil tightly; roots need space to breathe and grow.
Common mistake to avoid: Using heavy, compacted soil or containers without holes can cause root suffocation and fungal diseases.
2. Sowing or Planting
Arugula seeds are tiny and delicate. Sow them thinly at a depth of about 0.5–1 cm (¼–½ in). Space seeds or seedlings roughly 5 cm (2 in) apart to prevent overcrowding. Sow directly into the soil rather than transplanting to avoid disturbing tender roots.
If you want to speed up germination, soak the seeds in warm water for 4–6 hours before planting. This softens the seed coat and encourages sprouting. The ideal soil temperature for germination is between 15–20°C (59–68°F).
When conditions are right, the soil surface will feel cool and moist, not dry or crusted. After a week, look for tiny green shoots breaking through the earth—finger-thin, delicate stems, bright and eager.
Pro tip: Cover the pot loosely with a clear plastic dome or cling film to retain moisture until seedlings appear. Remove it once sprouts emerge to prevent damping off.
3. Watering and Sunlight
Watering is a balancing act. Arugula prefers consistently moist soil but hates sitting in water. Water deeply until you see moisture seeping from the drainage holes—this usually takes about 2–3 times per week in warm weather, less in cooler months.
Check moisture daily by touching the soil surface. It should feel damp—not dry and crumbly, nor soggy. Avoid overhead watering during hot sun to prevent leaf scorch and fungal risk; morning watering lets plants use water fully through the day.
In hot, dry, or windy environments, group your pots together to create a micro-humidity zone, and add mulch like straw or leaf litter to conserve soil moisture. If your area experiences extreme midday sun, provide a thin shade cloth for 2–3 hours to protect tender leaves.
Arugula needs 6–8 hours of direct sunlight daily to develop its characteristic flavor and energy for growth. In cloudy or low-light areas, supplement with a fluorescent grow light or grow arugula in the sunniest window space.
4. Feeding and Maintenance
Feed your arugula every 3–4 weeks with a mild, balanced fertilizer low in nitrogen (or a diluted organic compost tea). Over-fertilizing with nitrogen-rich products can make leaves grow fast but lose their peppery bite.
Thin out seedlings when they reach 3–4 true leaves by snipping the smallest plants at soil level. This prevents crowding and improves airflow, reducing disease risk. If soil settles and compacts, gently aerate with a small fork or chopstick to maintain root health.
Keep an eye on leaf color and texture—yellowing, curling, or spots can indicate nutrient deficiencies or water issues. If you see yellow leaves, it might be excess nitrogen; switch to fertilizers higher in phosphorus to encourage root and flower development instead of just leaves.
As I always say, “The secret is not more work — it’s regular care and observation.” Observing your plants is the easiest way to catch problems early and keep your arugula thriving.
5. Troubleshooting While They Grow
- Yellow leaves: Usually indicates excess nitrogen or poor drainage. Shift to lower nitrogen fertilizer, and ensure pots drain well.
- Stunted growth: Could mean too little sunlight or compacted soil. Move pots to a brighter location and gently aerate soil.
- Wilting or drooping leaves: Signs of underwatering or root damage. Check soil moisture and water deeply.
- Leaves with holes or distorted edges: Likely pests like flea beetles or aphids. Spray with insecticidal soap or rinse leaves gently.
- Poor germination: Seeds sown too deep or soil too cold. Keep seed depth shallow (1 cm) and soil temperature warm.
6. Harvesting
Harvest your arugula once the leaves are between 5–10 cm (2–4 in) long, tender, and dark green with slightly ruffled edges—usually between 70 and 90 days after sowing. Avoid letting plants bolt (send up flower stalks) as this reduces leaf quality and bitterness rises.
To pick, gently cut leaves off at the base or pull young plants entirely for baby leaf salads. The leaves should snap crisply, releasing a fresh, spicy aroma — the signature of perfectly grown arugula.
For best flavor, reduce watering in the last week before harvest. This concentrates nutrients and intensifies the peppery tang.
Store harvested arugula in a perforated plastic bag or container in the refrigerator between 4–7°C (39–45°F) for up to 2 weeks. Wash just before use to keep leaves fresh longer.
Extra Tips for Perfect Results
- Plant companions like basil, radishes, nasturtiums, and marigolds. They deter pests and improve flavor.
- Rotate your pots each growing season to avoid soil fatigue and build-up of pests or diseases in the soil.
- Mulch around your seedlings with straw or dried leaves to retain moisture and moderate soil temperature.
- Use rainwater when possible—it’s softer than tap water, which can harden soil over time.
- Cluster pots together in windy areas to provide mutual shelter and conserve moisture.
- During heatwaves, drape a thin white fabric over your pots during midday to shield tender leaves from scorching.
Common Mistakes and How to Fix Them
- Overwatering: Roots sit in water and rot. Let the top 2 cm (¾ in) of soil dry out before watering again.
- Weak growth: Too little light. Move your pot to a sunnier spot or provide supplemental lighting.
- Yellow leaves: Excess nitrogen. Switch to fertilizer with higher phosphorus and potassium.
- Poor germination: Seeds planted deeper than 1 cm (½ in). Sow shallow to increase success rate.
- Misshapen roots: Soil too compacted. Always mix in coarse sand or perlite for good aeration.
Harvest and Storage
Harvest gently by cutting leaves close to the soil rather than pulling to avoid disturbing root clusters—which allows regrowth for multiple harvests. When storing, keep arugula cool and humid but away from ethylene-producing fruits like apples, which speed spoilage.
Optimal storage temperatures are between 4 and 7°C (39 and 45°F). At these temperatures, fresh arugula can stay crisp up to 2 weeks. For longer preservation, dry the leaves carefully and store in airtight containers or freeze them chopped for use in cooked dishes.
If you want to save seeds, let some flowers bolt and mature. Collect seeds when their pods turn brown and dry, then store in a cool, dry place for sowing next season.
What Success Looks Like
Imagine pulling a handful of firm, fragrant arugula leaves from your pot—each leaf cool to the touch, deep green with hints of red or purple veins, and a crisp texture that snaps with a satisfying sound. The peppery bite dances on your tongue, fresh from your own care and attention. From a single 30 cm (12 in) pot, expect to yield about 1–2 kg (2–4 lb) of leaves over a season—enough for countless spicy salads and sandwiches.
Remember, gardening isn’t about perfection. It’s about consistent care, observing, and gently guiding nature. The quiet satisfaction of each harvest is a reward for your patience and perseverance.
Mini Recap — Your Success Checklist
- Pot depth: At least 30 cm (12 in).
- Soil mix: 70% loam, 20% compost, 10% sand.
- Watering: Deep watering 2–3 times per week, adjust by touch.
- Sunlight: 6–8 hours daily.
- Fertilizer: Every 3–4 weeks, low nitrogen.
- Harvest: 70–90 days after sowing.
Further Reading: Grow Dill in Pots: Ideal for Small Urban Gardens
Closing Reflection
Growing arugula in pots is less about battling nature and more about partnering with it. Every watering, every leaf you thin or harvest, teaches you small but meaningful lessons. Don’t rush the process. Observe your plants, feel the soil’s moisture, watch the sunlight shift. In these moments, you become not just a gardener, but a steward of life. And that is where the real joy of growing your own peppery salads begins.

Hi there — I’m Kyla, the creator behind Kyla Garden Tips 🌿
I’ve always been passionate about plants, flowers, and the simple joy that comes from growing something beautiful. What started as a small balcony garden has turned into a love for helping others create their own green spaces — no matter how big or small.