
Why Grow Radishes in Pots? Quick, Crisp, and Rewarding
If you’re pressed for space but crave fresh, crunchy radishes straight from your garden, you’re in the right place. Radishes are one of the fastest-growing vegetables you can cultivate — ready to harvest in just 30 days. That means you’ll enjoy snappy, peppery bites in a month without digging up a large garden bed. Plus, growing radishes in pots lets you take control of soil, water, and light, making it easier to prevent common problems like pests and wilting.
You can do this — even on a small balcony or windowsill. Radishes forgive minor mistakes and reward steady care with consistent yields. Follow these clear, simple steps, and I’ll help you solve every challenge along the way, from choosing the pot to harvesting the perfect roots. Let’s get growing!
Getting Ready — What You’ll Need
Before planting, gather your tools carefully. Here’s what you need and why:
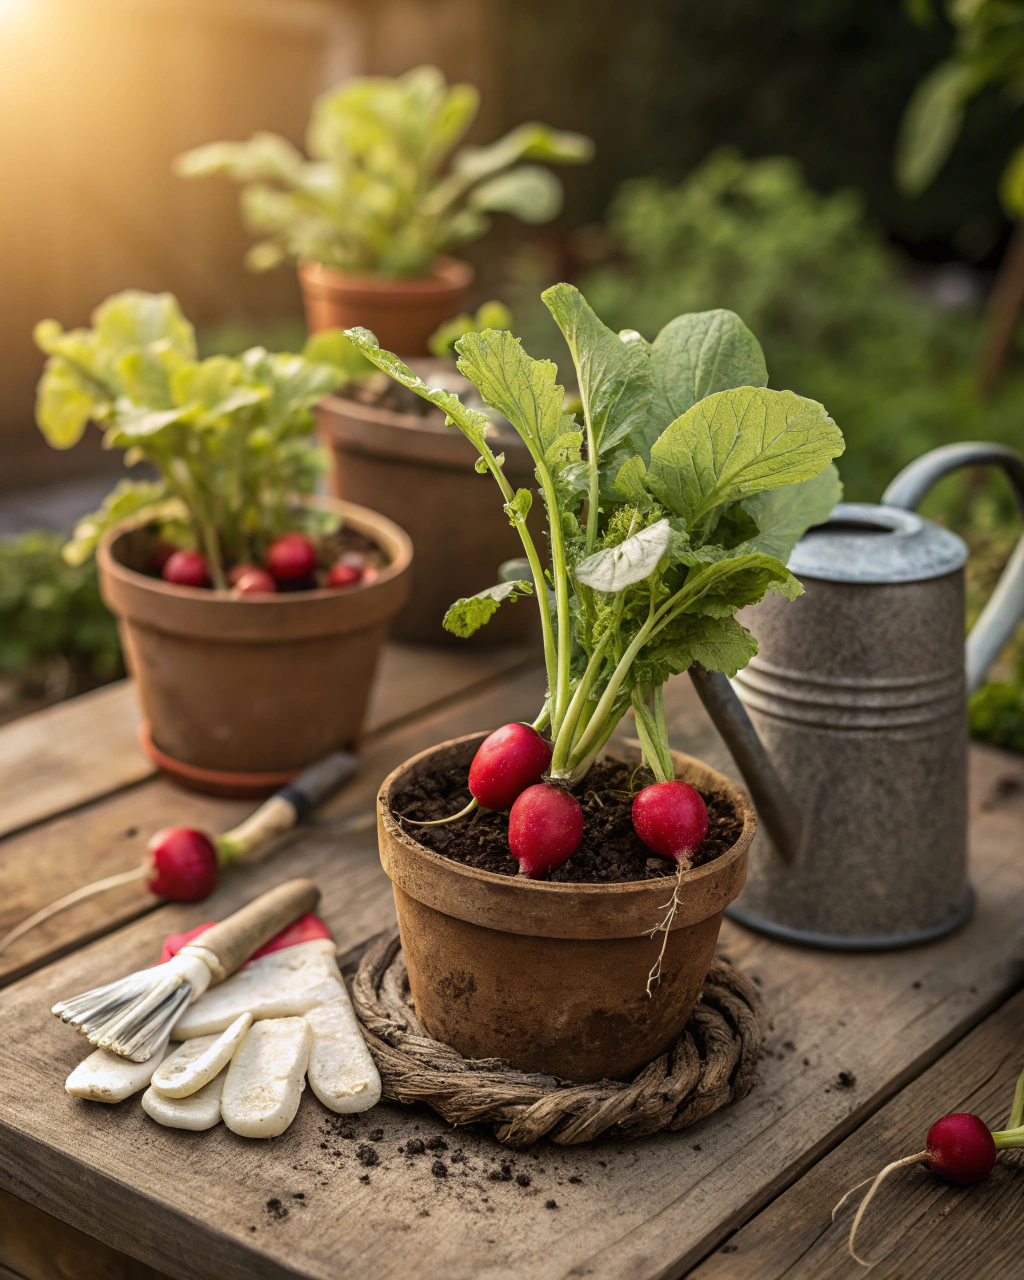
- Pot or container: At least 30 cm (12 in) deep and 30–40 cm (12–16 in) wide for 6–8 radishes. Choose containers with drainage holes to avoid soggy roots. (If your area is very hot, use clay pots to keep roots cool.)
- Potting soil: Use a loose, well-draining soil mix—ideally 70% loam, 20% compost, and 10% coarse sand. This mix balances nutrient retention with airflow.
- Fertilizer: Low-nitrogen fertilizers work best. A balanced organic option like fish emulsion or a liquid seaweed feed is ideal, applied every 3–4 weeks.
- Seeds: Look for quick-growing varieties like ‘Cherry Belle’, ‘French Breakfast’, or ‘Sparkler’. These mature fast and have classic flavor.
- Watering can or gentle spray bottle: To water evenly without washing away seeds.
- Garden trowel or small shovel: For pot preparation, soil mixing, and thinning seedlings.
- Labels or markers: To keep track of sowing dates and varieties.
- Optional: Mulch materials like straw or dried leaves to preserve moisture and suppress weeds.
- Sunlight: Choose a spot with at least 6–8 hours of direct sunlight each day, such as a balcony, patio, or windowsill.
If budget is tight, reuse an old bucket with holes drilled for drainage. Use homemade compost and coarse river sand for soil amendments. Even a small DIY kit will do—radishes aren’t fussy.
Step-by-Step — How to Grow in Pots
1. Preparing Your Pot
Start by washing your pot thoroughly to remove any residues or pathogens. This prevents infections that stunt radish growth. Place a drainage layer about 2–3 cm (1 inch) thick at the bottom—think broken pottery shards, pebbles, or coarse gravel. This ensures excess water can drain freely, protecting roots from rot.
Now mix your potting soil well. It should feel crumbly but hold together slightly when squeezed — like a wrung-out sponge. Fill the pot, leaving 2–3 cm (1 inch) space at the rim for watering. Avoid compacting the soil tightly. Compacted soil suffocates roots and causes misshapen radishes.
One mistake to avoid: Never fill a pot without drainage holes or compress soil too hard. Radishes need air around their roots to grow straight and develop crunch. An ideal soil pH is slightly acidic to neutral, around 6.0 to 7.0. You can test with inexpensive pH kits if unsure.
2. Sowing or Planting
Radish seeds are small and quick to germinate. Sow them at a depth of 0.5–1 cm (¼ inch to ½ inch). Plant seeds about 2.5 cm (1 inch) apart, ideally in rows or circles, leaving enough space for roots to expand.
Sow when soil temperature is between 10–24°C (50–75°F). If you live in cooler climates, planting in early spring or fall works best. You can pre-soak seeds in water for 2 hours before sowing to speed germination, but this isn’t required.
You’ll know conditions are right when the surface feels warm but not hot, and the soil isn’t soggy. Seeds should nestle lightly in soil, not buried. The spot will feel fresh and slightly earthy.
Pro tip: Cover the pot with a thin layer of damp newspaper or cling film to retain moisture during germination. Remove as soon as sprouts appear—usually within 4–6 days.
3. Watering and Sunlight
Water consistently but gently. Your goal is moist soil — not saturated or dry. Water deeply until you see water draining from the pot’s holes, about 2–3 times per week in warm weather. In cooler or humid areas, reduce watering to prevent root rot.
Feel the soil’s surface: it should be damp but not muddy. If the top 2 cm (¾ inch) dries out, it’s time to water again. Avoid puddles on the surface; radishes hate “wet feet.”
In hot, dry, or windy areas, group pots together to create a microclimate that holds humidity. Mulching the surface with straw or dried leaves helps retain moisture and regulate temperature. Partial shade during the hottest midday hours can prevent leaf scorch.
Radishes thrive with 6–8 hours of sunlight daily. If your area is often cloudy, place pots near south-facing windows or supplement with grow lamps. Lack of light slows growth and weakens roots.
4. Feeding and Maintenance
Feed your radishes with a balanced, low-nitrogen liquid fertilizer every 3–4 weeks. Nitrogen promotes leaf growth but can reduce root size. Use fertilizers richer in phosphorus and potassium to encourage healthy, crisp roots.
Once seedlings reach about 5 cm (2 inches), thin them to 4–5 cm (1.5–2 inches) apart by snipping weaker sprouts—don’t pull, as roots can disturb neighbors. Thinning maximizes root size and reduces overcrowding.
Check soil aeration by gently loosening the surface layer once a week with a small fork or trowel. This prevents crusting, which blocks water and oxygen.
Overfeeding leads to lush, dark leaves, but small or misshapen roots. Underfeeding causes pale growth and slow development. Watch for symptoms and adjust accordingly: yellow leaves mean too much nitrogen, pale or stunted growth means lack of nutrients.
As I always say, “The secret is not more work — it’s regular care and observation.” Watch your radishes daily for the best results.
5. Troubleshooting While They Grow
Issues happen, but with quick action, you can nip them in the bud:
- Yellow leaves: Often excess nitrogen. Cut back on high-nitrogen fertilizer and apply a fertilizer higher in phosphorus.
- Stunted or slow growth: Too little light or poor soil quality. Move pots to brighter areas and refresh soil with compost if necessary.
- Leaves wilting: Underwatering or root damage. Check soil moisture and roots gently for rot.
- Pests like flea beetles: Use row covers or organic insecticidal soap to protect young plants.
- Poor germination: Seeds planted too deep or soil too cold. Ensure planting depth is shallow and temperature is within range.
- Misshapen roots: Compact soil or overcrowding. Loosen soil and thin seedlings properly.
6. Harvesting
Radishes mature quickly—usually between 30–40 days after sowing, depending on variety. You’ll see bright, firm roots pushing just above soil with smooth, glossy texture. Color varies: cherry reds, whites, pinks, purples. Their smell is fresh, spicy, and earthy.
Before harvesting, try reducing watering for the final 5–7 days to intensify flavor and improve firmness. Gently grasp the radish at the base of its leafy tops and tug upwards. A satisfying pop and crack indicates a crisp, juicy root.
If you prefer, use scissors to cut leaves about 2 cm (¾ inch) above soil to avoid disturbing neighbors.
Store radishes in a plastic bag or container in the fridge at around 4–7°C (39–45°F). They stay fresh for up to 2 weeks. For longer storage, pickle them with vinegar and spices, dry slices for snacks, or blanch and freeze.
Extra Tips for Perfect Results
- Plant companion plants like lettuce, spinach, onions, or chives nearby — they deter pests and use space efficiently.
- Rotate your pot locations each season to prevent soil fatigue and disease buildup.
- Mulch the soil surface with straw or dry leaves to keep moisture steady and suppress weeds.
- Use rainwater to water if possible—tap water often contains minerals that compact soil over time.
- Cluster pots tightly in windy areas to protect plants and improve humidity retention.
- Shade pots briefly during scorching midday sun with a light fabric or netting to prevent leaf burn.
Common Mistakes and How to Fix Them
- Overwatering: Roots become soft and rot easily — allow the top 2 cm (¾ inch) of soil to dry before watering again.
- Weak growth: Insufficient sunlight — relocate pots to a sunnier spot.
- Yellow leaves: Excess nitrogen fertilizer — switch to a higher-phosphorus feed.
- Poor germination: Seeds sown too deep — keep depth to 0.5–1 cm (¼–½ inch).
- Misshapen roots: Soil too dense or compacted — add coarse sand or perlite for better airflow.
Harvest and Storage
Harvest gently to preserve root and leaf integrity. Pull radishes when they are firm and brightly colored, about 30–40 days after sowing. If you see a slight fuzz or softness, harvest immediately to avoid decay.
For storage, keep radishes in a cool, dark place at around 4–7°C (39–45°F) with high humidity. They will last fresh for up to 2 weeks in the refrigerator’s crisper drawer. Avoid washing them until ready to eat.
If you want to preserve excess radishes, consider pickling in brine with garlic and dill — a traditional method that intensifies the flavor. Alternatively, blanch and freeze or slice and dry for a crunchy snack addition.
Finally, save seeds from healthy, mature radish seed pods for next season. Harvest pods when dry, open them carefully, and store seeds in a paper envelope in a cool, dry place.
What Success Looks Like
When you pull your first firm, fragrant radish from the pot, it’s a simple joy. The crisp snap, the peppery bite, the fresh earthy scent — proof that your care and patience worked. Expect yields of about 1–2 kg (2–4 lb) per standard pot, enough for salads, snacks, and sandwiches.
Success in container gardening is more than just the harvest. It’s about steady observation, adjusting as needed, and connecting with your plants. Every day you see slight changes, tiny growth spurts, or even leaf blushes is a lesson in nature’s rhythm. Embrace consistency, enjoy the tactile pleasure of soil between your fingers, and savor the fresh flavors that no store-bought radish can match.
Mini Recap — Your Success Checklist
- Pot depth: At least 30 cm (12 in).
- Soil mix: 70% loam, 20% compost, 10% coarse sand.
- Watering: Deep watering 2–3 times per week, allowing top 2 cm (¾ inch) to dry.
- Sunlight: 6–8 hours per day.
- Fertilizing: Low nitrogen, every 3–4 weeks.
- Spacing: 2.5 cm (1 in) between seeds, thin to 4–5 cm (1.5–2 in).
- Harvest: Typically 30–40 days after sowing.
Closing Reflection
Remember, gardening is a journey, not a test. Every plant you grow teaches you something new about patience, observation, and adaptation. Don’t rush—carefully watch how your radishes respond to water, sunlight, and nutrition. Adjust your techniques, make peace with small failures, and celebrate the crisp crunch of your first homegrown radish. That connection with nature, the rhythm of growth and harvest, is what makes you a gardener.

Hi there — I’m Kyla, the creator behind Kyla Garden Tips 🌿
I’ve always been passionate about plants, flowers, and the simple joy that comes from growing something beautiful. What started as a small balcony garden has turned into a love for helping others create their own green spaces — no matter how big or small.