
Grow Papayas in Pots for a Taste of the Tropics
There’s something magical about harvesting your own papaya — that sweet, vibrant flesh carrying a hint of sunshine and tropical breeze. You might think growing such a tropical fruit requires acres of land or a greenhouse, but here’s the truth: you can grow papayas in pots. Even if your space is limited to a balcony or patio, a single healthy papaya plant will reward you with delicious fruit and a slice of the tropics right at home. I’ll take you through clear, practical steps — no guesswork, no overwhelm — so you can grow, nurture, and enjoy papayas regardless of your experience or space. Let’s get started.
Getting Ready — What You’ll Need
Before planting, gather these essentials to set your papaya up for success:
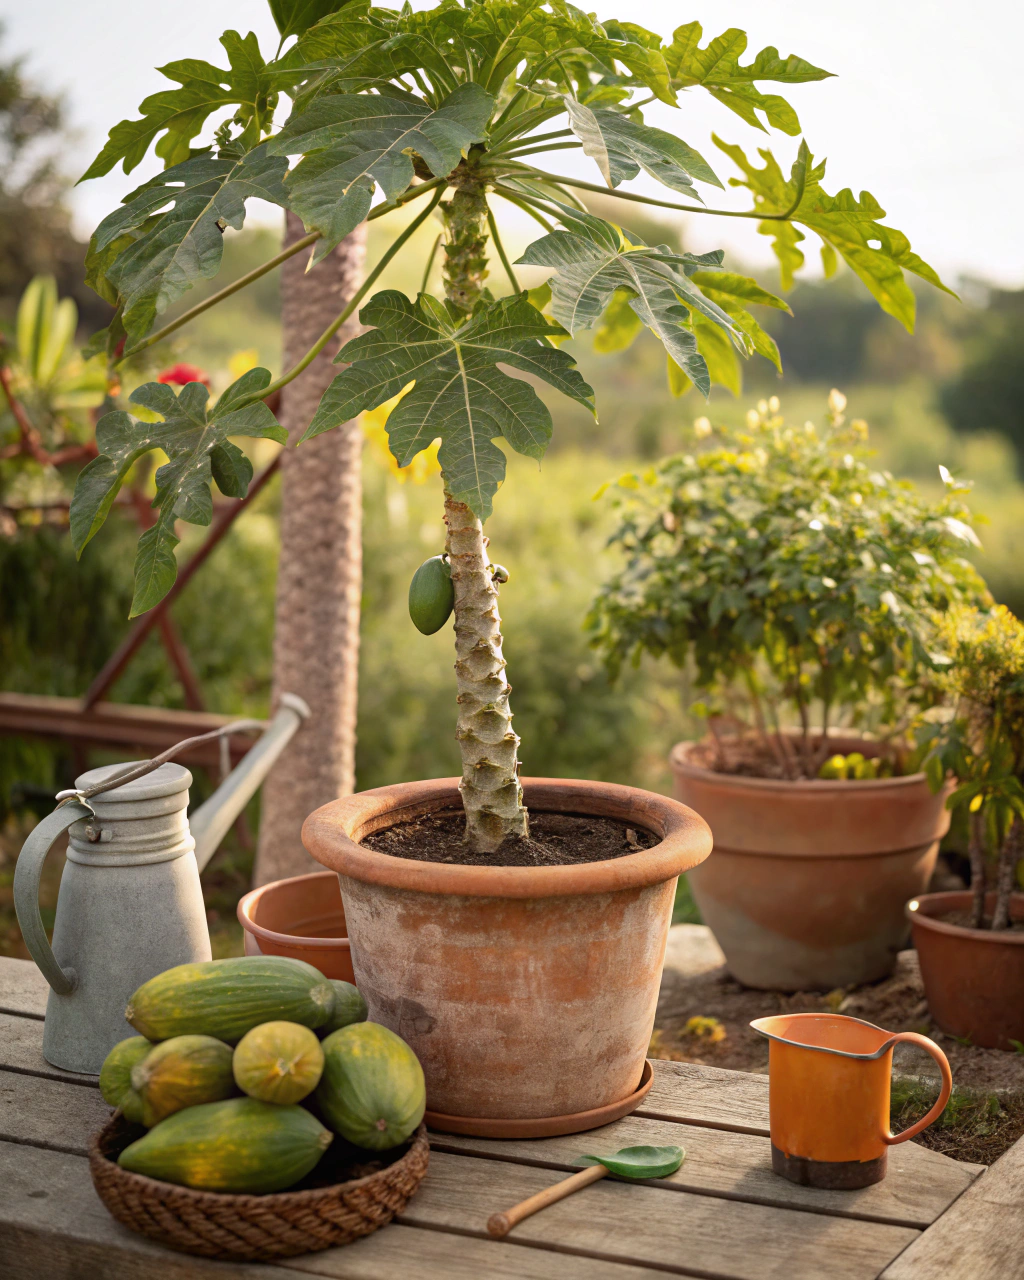
- Container: Choose a pot at least 40-50 cm (16-20 inches) deep and wide. Papaya roots are sensitive but need room to spread. Terracotta or plastic both work well (if your area is very hot, use clay pots to keep roots cool).
- Soil: Use a light, well-draining mix — ideally 70% loam, 20% organic compost, and 10% coarse sand or perlite. This balance ensures moisture retention without waterlogging, a common killer of papayas.
- Fertilizer: A balanced, low-nitrogen fertilizer (like a 10-20-20 NPK formula) supports fruit development. Organic options include composted manure or seaweed extract.
- Seeds or seedlings: For faster results, buy young papaya plants, but seeds are rewarding to start yourself. Opt for smaller varieties like ‘Red Lady’ or ‘Solo’ which adapt well to pots.
- Water source: Access to gentle watering, ideally with a watering can or drip system. Avoid heavy hose sprays that can compact the soil.
- Sunlight: Papayas crave at least 6-8 hours of direct sunlight daily. A south-facing balcony or sunny spot works best.
- Tools: Basic hand tools like a trowel, pruning shears, and gloves. These make planting and maintenance easier.
Substitutes? If compost isn’t available, aged leaf mold or peat moss can enrich soil. DIY fertilizer teas from compost scraps can nourish your papaya organically. Preparing well upfront saves time and frustration later.
Step-by-Step — How to Grow Papayas in Pots
1. Preparing Your Pot
Start by thoroughly cleaning your pot with warm soapy water—this removes any lingering pathogens. Ensure the pot has at least 4-5 drainage holes to avoid soggy roots. For better drainage, place a 2-3 cm (about 1 inch) layer of broken terracotta shards or coarse gravel at the base. This prevents water from pooling.
Mix your soil components well. Aim for a light texture—when you squeeze a handful, the soil should feel firm but crumble apart easily, like a wrung-out sponge. This texture holds moisture but allows air to reach roots.
Avoid compacting the soil too tightly. Dense soil suffocates roots and causes rot. Also, test your soil pH; papayas prefer slightly acidic to neutral soil around pH 6.0-6.5. Too alkaline or acidic soil impairs nutrient uptake.
2. Sowing or Planting
If starting from seed, soak them overnight in warm water (around 25-30°C / 77-86°F) to soften the outer shell and jumpstart germination. Sow seeds at a shallow depth of 0.5–1 cm (about ¼ inch). Plant 2-3 seeds per pot to ensure at least one strong seedling, thinning to the healthiest plant after emergence.
The soil temperature should be stable and warm — ideally above 21°C (70°F). You’ll notice tiny shoots poking through the soil within 10-14 days. The sprouted leaves are bright green and soft to the touch — the first sign of success.
Pro tip: Cover your pot with clear plastic wrapped loosely to maintain humidity and warmth until germination. Remove the cover once you see green shoots to prevent fungal problems.
3. Watering and Sunlight
Water deeply but infrequently. The goal is to thoroughly moisten the soil to the root zone yet allow the top 2-3 cm (about 1 inch) of soil to dry out between waterings. On warm days, aim for watering about 2–3 times per week. Check by touching the soil — if it feels dry or slightly cool, it’s time to water.
In hot, dry, or windy conditions, group pots together to create a microclimate that retains humidity. Mulching with straw or dry leaves can cushion soil temperature and moisture. In the hottest midday sun, provide temporary shade with a fine fabric cloth—papayas like intense light but can scorch.
Papayas thrive with 6 to 8 hours of direct sunlight daily. If your area is cloudy, supplement with grow lights or move the pot to capture the brightest spot, especially during morning hours when dew and lower temperatures aid moisture retention.
4. Feeding and Maintenance
Feed your papaya every 3 to 4 weeks with a balanced fertilizer that’s higher in phosphorus and potassium than nitrogen to encourage flowers and fruit rather than excessive leafy growth. Organic options like diluted fish emulsion or compost tea work well.
Prune any damaged lower leaves to improve airflow and reduce disease risk. If the plant seems “leggy,” pinch back the growing tip to encourage bushier growth. Check soil aeration by gently loosening the top layer; compacted soil blocks oxygen and hinders root health.
Watch for signs of nutrient imbalance: pale or yellowing leaves often signal overwatering or lack of potassium. Stunted growth and curled leaves may hint at phosphorus deficiency.
As I always say, “The secret is not more work — it’s regular care and observation.” Paying close attention to your plant’s condition saves you from bigger issues later.
5. Troubleshooting While They Grow
- Yellow leaves: Usually excess nitrogen; switch to fertilizer with higher phosphorus (like 10-20-20) or add compost rich in potassium.
- Stunted growth: Often from poor light or root crowding — move pot to a sunnier spot or repot into a bigger container if roots are developing outside the drainage holes.
- Soft, mushy stems or roots: Sign of overwatering or poor drainage — reduce watering frequency and check that holes aren’t blocked; improve soil mix with more coarse sand or perlite.
- Pests: Watch for aphids and spider mites. Wipe leaves gently with a damp cloth or spray neem oil. Introduce beneficial insects like ladybugs if possible.
- Poor germination: Seeds planted too deep (more than 1 cm) can suffocate; keep planting shallow and soil moist, not soaked.
6. Harvesting
Your papaya fruits will mature roughly 70–90 days after flower emergence. Look for fruits changing from dark green to yellow-orange, with a slightly soft texture when gently pressed. You may also notice a rich, sweet scent developing near the fruit — a clear signal it’s ready to pick.
When harvesting, gently twist or cut the fruit from the stem. You should hear a smooth “pop” or slight cracking sound, indicating a clean separation without damaging the plant.
To enhance flavor, slightly reduce watering during the last week before harvest — this concentrates sugars. Once picked, store papayas in a cool, dark place at 4–7°C (39–45°F) where they last for up to 2 weeks.
For longer preservation, papayas can be frozen (peeled and sliced), dried into chips, or even pickled in a sweet-spicy brine.
Extra Tips for Perfect Results
- Plant companions like basil, marigold, or nasturtium nearby to deter pests naturally and encourage pollinators.
- Rotate pots each season to fresh soil and prevent nutrient depletion and root diseases.
- Mulch with straw or dried leaves to retain humidity around roots and maintain even soil temperature.
- Use collected rainwater when possible — it’s softer and better for soil health than hard tap water.
- Cluster pots together in windy areas to stabilize plants and create a shared humid microenvironment.
- If you’re under very hot sun, adding a light fabric shade between 11 a.m. and 3 p.m. prevents sunburn without sacrificing overall light.
Common Mistakes and How to Fix Them
- Overwatering: Roots become soft and rot; always wait for the top 2 cm of soil to dry before watering again.
- Weak growth: Usually from too little light; relocate your pot to a sunnier spot or use supplemental lighting.
- Yellow leaves: Commonly caused by excess nitrogen; switch to fertilizer with higher phosphorus and potassium.
- Poor germination: Seeds planted too deep (over 1 cm) limit sprouting; sow shallowly.
- Misshapen roots: Result from compacted soil; always add coarse sand or perlite to maintain airflow.
Harvest and Storage
Harvest papayas carefully — hold the stem, twist or cut with sharp scissors to avoid damaging the tree. Handle fruits gently; bruising cuts shelf life.
Store ripe papayas in a dark, cool place at 4–7°C (39–45°F). Here, they keep fresh for up to 2 weeks. Avoid storing near ethylene-producing fruits like bananas to prevent over-ripening.
For longer storage, peel and freeze slices or dry thin pieces into chips. Pickling papaya rind is another tasty option in many tropical cuisines.
Save seeds from fully ripe fruits by scooping out the gelatinous coating and rinsing under running water. Dry seeds on a paper towel for 7-10 days in a shaded, well-ventilated spot. Store seeds in a cool, dry container for next season’s sowing.
What Success Looks Like
When you finally hold your first bright, fragrant papaya, you’ll feel that deep satisfaction unique to homegrown produce. The fruit should weigh between 1–2 kg (2–4 lb) per plant when grown in pots — a generous yield for your effort and space.
Pulling that heavy fruit from the stem, admiring the golden-orange skin warmed by the sun, your senses will tell you — this was worth every step. Growing papayas in pots teaches patience, observation, and connection with nature. Every leaf and fruit is a small victory.
Mini Recap — Your Success Checklist
- Pot depth: At least 30 cm (12 inches).
- Soil mix: 70% loam, 20% compost, 10% coarse sand or perlite.
- Watering: 2–3 times per week, adjusted by touch and weather.
- Sunlight: Minimum 6–8 hours daily.
- Fertilizer: Every 3–4 weeks, low nitrogen.
- Harvest time: 70–90 days after flowering.
Closing Reflection
Remember, growing papaya is less about perfection and more about consistent, small acts of care. Each watering, pruning session, and sunny day spent watching your plant grow builds your skills and connection with your garden. Every plant you grow teaches you something new. Don’t rush it — observe, adjust, and enjoy. That’s the heart of gardening, and that’s how you’ll master papayas in pots.

Hi there — I’m Kyla, the creator behind Kyla Garden Tips 🌿
I’ve always been passionate about plants, flowers, and the simple joy that comes from growing something beautiful. What started as a small balcony garden has turned into a love for helping others create their own green spaces — no matter how big or small.