
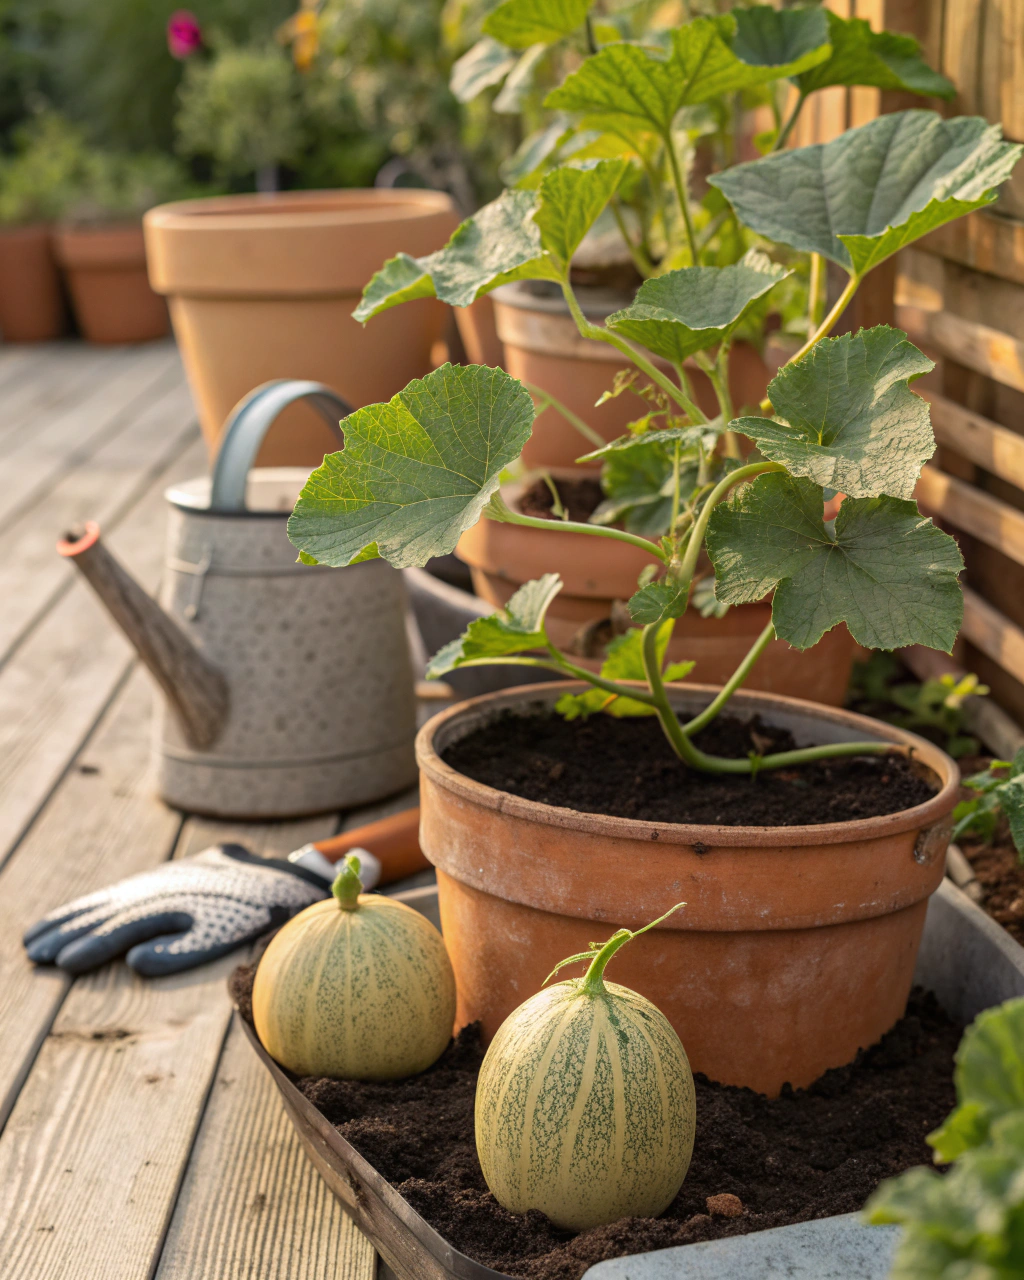
Why Grow Melons in Containers?
Melons are the sweet reward of summer gardens — their juicy, fragrant flesh a delight after warm days. But what if you don’t have a sprawling garden? You can still grow these fruits in containers on a balcony, patio, or small yard. Growing melons in pots saves space without sacrificing flavor or yield. It’s not just practical; it’s deeply satisfying. You get control over soil, water, and pests, creating perfect conditions for sweet, ripe melons. With easy-to-follow steps and smart tips, you can succeed even if your space is limited. So roll up your sleeves — let’s turn your container into a melon powerhouse.
Getting Ready — What You’ll Need
Before planting, gather these essentials to set your melons up for success:
- Containers: Choose pots at least 30 cm (12 in) deep and 40–50 cm (16–20 in) wide. Melons need room to grow roots and spread vines. Clay pots help roots stay cool (ideal in hot climates), but plastic is lighter and retains moisture better.
- Soil mix: Prepare a blend of 70% loam or potting soil, 20% well-rotted compost, and 10% coarse sand or perlite for drainage and aeration. This balanced mix ensures nutrients, moisture retention, and airflow around roots.
- Fertilizer: Use a balanced, low-nitrogen fertilizer such as a 5-10-10 NPK (nitrogen-phosphorus-potassium) formula. Melons require extra phosphorus and potassium for sweet fruit development. Organic options like fish emulsion or compost tea also work well.
- Seeds or seedlings: Select compact or bush varieties ideal for containers, such as ‘Sugar Baby’, ‘Minnesota Midget’, or ‘Bush Sugar Baby’. These typically produce melons weighing between 1 and 3 kg (2–6 lb).
- Watering tools: A watering can with a fine rose nozzle helps avoid washing away soil. A moisture meter (optional) can guide watering accurately.
- Supports: Small trellises or stakes to train vines vertically; saves space and improves air circulation, reducing disease.
- Light: Melons need 6–8 hours of direct sunlight daily. Position pots accordingly for best light exposure.
- Mulch: Straw or leaf mulch to keep soil moist and cool while slowing weeds and soil crusting.
(Pro tip: If budget is tight, repurpose large buckets or wooden boxes with holes drilled for drainage. Compost can come from your kitchen scraps.)
Step-by-Step — How to Grow Melons in Pots
1. Preparing Your Pot
Start with a clean pot to prevent disease. If you’re reusing containers, scrub them with a diluted bleach solution and rinse well. Check that drainage holes are unobstructed. Melons hate “wet feet” and need excellent drainage for healthy roots.
Add a drainage layer at the bottom, about 3–5 cm (1–2 in) of gravel or broken pottery shards to prevent soil clogging. Fill the pot with your prepared soil mix, leaving 4–5 cm (2 in) below the rim to allow watering without spillage.
Gently firm the soil to remove large air pockets but don’t compress it hard. The texture should be light, crumbly, and cling slightly when squeezed — like a damp sponge, not soggy mud.
Avoid: compacted soil or pots with no drainage — roots will suffocate causing yellow, wilted leaves and stunted growth.
2. Sowing or Planting
Sow melon seeds directly in the prepared pot or transplant seedlings started indoors.
- Sow depth: Plant seeds at 1 cm (0.5 in) deep — shallow enough to emerge quickly.
- Spacing: If planting multiple seeds, place them about 15–20 cm (6–8 in) apart for bush varieties.
- Temperature: Melons prefer a warm start; soil temperature should be at least 21–27°C (70–80°F) for germination.
If you’re starting indoors, soak seeds for a few hours in warm water beforehand to speed germination. You’ll notice tiny white tips pushing through soil after 7–10 days. Seedlings should feel firm and vibrant, with no limp or yellowing leaves.
Pro tip: Use clear plastic over the pot during germination to keep humidity high — just remove it when seedlings emerge to avoid fungal problems.
3. Watering and Sunlight
Water is key — melons need consistent moisture, but not soggy soil. Water deeply enough so moisture reaches the bottom of the pot. In warm weather, this means watering about 2–3 times per week, but adjust if it rains or if your pots dry quickly.
Visual cues help: soil should feel like a wrung-out sponge — cool to touch but not dripping. Leaves will visibly perk up after watering. If leaves droop early in the morning, it’s a warning to water soon.
Melons thrive with full sun, needing 6 to 8 hours of direct rays daily. If you’re in a cloudier or cooler zone, position pots on south-facing balconies or near reflective walls to maximize light.
In hot, windy areas, group pots close to create a humid microclimate. Mulch soil and consider partial shade during afternoon peaks to prevent heat stress.
4. Feeding and Maintenance
Feed your melon plants every 3–4 weeks with a balanced fertilizer, lowering nitrogen content to encourage fruit over leaf growth. Use liquid feeds or slow-release granules according to label directions.
Thin seedlings early — keep the strongest plant if multiple germinated in the same pot. This reduces competition for limited nutrients and space.
As vines grow, prune side shoots that trail and become too crowded. This focuses energy on main stems and fruit production. Keep soil aerated by lightly scratching or turning the surface to prevent crusting.
Watch for symptoms of nutrient imbalance: pale or yellow leaves may mean nitrogen deficiency; excessively dark green foliage with scant fruit points to overfeeding.
“The secret is not more work — it’s regular care and observation.” This approach has helped me achieve the sweetest, largest melons in my container garden year after year.
5. Troubleshooting While They Grow
If you spot yellowing leaves, first check watering. Overwatering leads to root rot; under-watering stresses the plant.
- Yellow leaves: Often caused by excess nitrogen or soggy soil. Remedy: add phosphorus-rich fertilizer, and ensure drainage holes aren’t blocked.
- Stunted growth: Likely too little sun or too crowded. Move the pot to a sunnier spot and thin seedlings.
- Pests: Aphids, spider mites, and cucumber beetles can attack. Use insecticidal soap or introduce ladybugs for eco-friendly control.
- Powdery mildew: Common in humid conditions. Improve air circulation by pruning and avoid wetting leaves when watering.
Keeping a close eye allows you to catch small issues before they become big problems.
6. Harvesting
Your melons are ready to harvest in about 70–90 days after sowing, depending on the variety.
Check for these signs:
- The fruit’s skin color deepens (varies by variety—yellow, orange, or beige tones become more intense).
- The melon detaches easily from the vine with a gentle twist or slight pull.
- The fruit emits a sweet, musky aroma near the stem.
- Skin surface feels firm but yields slightly under pressure.
Reducing watering in the last week helps concentrate sugars for better flavor. When you harvest, there’s a satisfying “pluck” or slight snap as the vine parts, releasing your sweet prize.
Store harvested melons in a dark, cool spot at 4–7°C (39–45°F) for up to 2 weeks. Too warm and they quickly become overripe; too cold (below 4°C) can damage the fruit.
Extra Tips for Perfect Results
- Grow companion plants like marigold (deters pests), basil (improves flavor), nasturtium (attracts beneficial insects), and
- Rotate your melon pots each season to prevent soil fatigue and disease build-up.
- Mulch with straw or dried leaves to hold soil moisture and moderate temperature swings.
- Use rainwater when possible — tap water’s minerals can build up and harden soil over time.
- In windy locations, cluster pots for stability and better humidity retention.
- Under intense midday sun, apply a thin fabric shade to reduce sun scorch and heat stress.
Common Mistakes and How to Fix Them
- Overwatering: Roots soften and rot. Let the top 2 cm (0.8 in) of soil dry before watering again.
- Weak growth: Insufficient sunlight. Move pots to a sunnier location receiving at least 6 hours of direct sun.
- Yellow leaves: Excess nitrogen promotes leafy growth over fruit. Switch to fertilizer with higher phosphorus and potassium.
- Poor germination: Seeds planted too deep. Keep sowing depth to 0.5–1 cm (0.2–0.4 in).
- Misshapen roots: Soil is too dense. Mix in coarse sand or perlite for improved aeration.
Harvest and Storage
When your melon is fully ripe, harvest gently to avoid damaging delicate vine stems or bruising fruit. Use your fingers to twist the fruit away with minimal force or a sharp knife if necessary, cutting the stem 1–2 cm (0.5–1 in) above the fruit.
Store melons in a cool, dark place at around 4–7°C (39–45°F) with high humidity for up to 2 weeks. Avoid refrigerating uncut melons at temperatures below 4°C to prevent flavor and texture loss.
For longer preservation, you can:
- Cut and freeze melon pieces (ideal for smoothies or desserts).
- Dry melon strips or freeze-dry.
- Pickle the rind for a sweet and tangy treat.
Save seeds from the largest, healthiest fruits. Clean seeds well and dry for a few days before storing in a cool, dark place for next season’s planting.
What Success Looks Like
When you finally lift the perfect ripe melon from its pot, you’ll feel a quiet pride. The skin should be firm, with a fragrant aroma that hints at the sweet flesh inside. The first slice releases a burst of juicy scent and rich flavor — proof that patience, care, and observation pay off.
With good conditions and care, expect a yield of about 1–2 kg (2–4 lb) per container from bush-type melons. The rewards aren’t just in the fruit but in the rhythm of nurturing nature within limited space, connecting you to the growing process every step.
Mini Recap — Your Success Checklist
- Pot depth: At least 30 cm (12 in).
- Soil mix: 70% loam, 20% compost, 10% sand/perlite.
- Watering: Deeply, 2–3 times per week, adjusted by soil feel.
- Sunlight: Minimum 6–8 hours direct each day.
- Fertilizer: Every 3–4 weeks, with low nitrogen.
- Harvest: 70–90 days after sowing.
Closing Reflection
Every melon you nurture in your container is a small triumph — not because it’s perfect, but because you show up for it. Growing melons in pots teaches you patience, observation, and a deeper connection with the natural rhythms at play. Don’t rush; adjust as you learn. Celebrate small successes, like that first joyful fruit plucked from a humble pot. You are not just growing melons; you’re shaping your garden and your gardener’s instinct. That’s the real reward.

Hi there — I’m Kyla, the creator behind Kyla Garden Tips 🌿
I’ve always been passionate about plants, flowers, and the simple joy that comes from growing something beautiful. What started as a small balcony garden has turned into a love for helping others create their own green spaces — no matter how big or small.