
Why Grow Blackberries in Pots?
Blackberries are an incredibly rewarding fruit to grow, especially when space is limited. You can do this – even if you have just a small balcony or a sunny windowsill. These berries bring a burst of intense flavor and a vivid splash of deep purple to your garden, plus they’re packed with vitamins and antioxidants. Growing them in pots lets you control soil quality, monitor moisture, and easily protect plants from pests. With the right compact varieties and careful care, you’ll enjoy fresh, juicy berries all season without needing a large garden plot. I’ll walk you through each step, offering practical solutions and tips for success – even if it’s your first time growing blackberries this way.
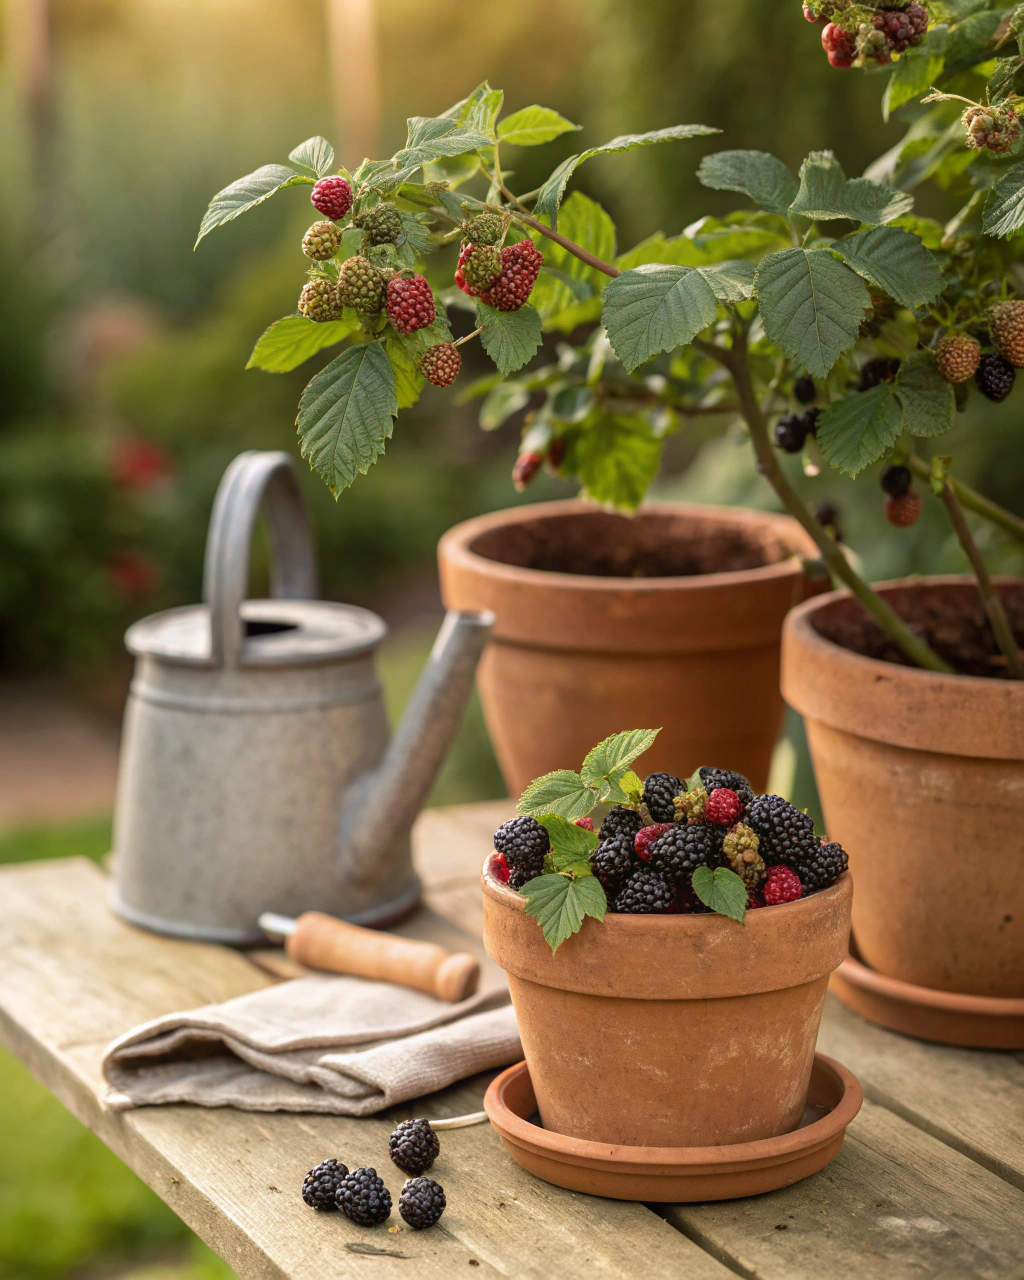
Getting Ready — What You’ll Need
Before you begin, gather these essentials:
- Containers: At least 30 cm (12 in) deep and 40–50 cm (16–20 in) wide to allow sufficient root growth. Choose plastic or glazed pots for moisture retention; use clay pots in hot climates to keep roots cool.
- Soil: A loose, well-draining mix with 70% loam, 20% compost, and 10% coarse sand or perlite. This ensures aeration and nutrient availability.
- Fertilizer: Balanced, low-nitrogen fertilizer (e.g., 5-10-10 NPK) to promote flowering and fruiting rather than leafy growth.
- Light: Blackberries demand bright sunlight – aim for at least 6–8 hours daily.
- Tools: Pruning shears, a watering can with a fine rose for gentle watering, a trowel, and gloves to protect your hands from thorns.
- Plant material: Choose compact, everbearing or dwarf blackberry varieties perfect for containers, such as ‘Baby Cakes’, ‘Black Satin’, or ‘Keepsake’.
(If you’re on a tight budget, use untreated recycled buckets with drainage holes and homemade compost. For soil substitutes, blend garden loam with leaf mold and coarse sand.)
Step-by-Step — How to Grow in Pots
1. Preparing Your Pot
First, clean your pot thoroughly to remove old soil or pathogens. Check there are sufficient drainage holes—ideally at least 3–4 holes evenly spaced. Without proper drainage, roots will suffocate and rot. Place a drainage layer of about 3 cm (1 in) of coarse gravel or broken pottery shards at the bottom. This prevents water logging.
Fill your pot with your prepared soil mix loosely — avoid compacting it. The texture should feel like a sponge that’s been wrung out, moist but not soggy. Compressing soil too tightly reduces oxygen around roots, stunting growth. The ideal pH is slightly acidic to neutral: about pH 5.5–7.
Common Pitfall: Avoid skipping the drainage layer or using heavy clay soil. Either one leads to water pooling and root rot.
2. Sowing or Planting
Blackberries are usually grown from young plants or canes rather than seeds, which take longer and have uneven germination. When planting canes, dig a hole about 20 cm (8 in) deep in the soil inside your pot. Space multiple canes at least 20 cm (8 in) apart to give them breathing room.
If you do use seeds, soak them in water overnight to soften the seed coat and improve germination. Sow seeds at a shallow depth of 0.5–1 cm (¼–½ in), covering lightly with soil. Keep soil temperature around 18–22°C (64–72°F) for best germination. You’ll know it’s right when the surface feels consistently moist and warm to the touch, but never waterlogged.
Pro Tip: When planting canes, prune them to about 20 cm (8 in) above soil level to encourage new shoots and reduce transplant shock.
3. Watering and Sunlight
Blackberries in pots dry out faster than garden soil because of limited volume. Aim to water deeply until you see excess moisture draining from the pot base — usually 2–3 times a week in warm weather. The soil should be moist like a wrung sponge, not wet or bone dry. Feel the top 2–3 cm (1 in) of soil; if it’s dry, it’s time to water again.
Place your pot where it receives at least 6–8 hours of direct sunlight each day. This sunlight fuels berry sweetness and healthy leaf growth. In cloudier or colder zones, supplement light with reflective surfaces or move pots midway through the day to catch sun rays. In hot, dry, or windy areas, group pots close together to preserve humidity or add a layer of mulch on top to reduce evaporation.
During the hottest hours, consider shading your plants with a lightweight fabric to prevent leaf scorch.
4. Feeding and Maintenance
Feed your blackberries every 3–4 weeks with a water-soluble fertilizer low in nitrogen but richer in phosphorus and potassium to promote fruit development. For example, use an NPK ratio like 5-10-10. Overfeeding nitrogen leads to vigorous leafy growth but poor fruit yields.
Thin out excessive shoots to maintain airflow and light penetration—this minimizes disease. Regularly check soil for compaction and gently loosen the top 2–3 cm to aid root breathing. If leaves turn pale or growth stalls, it’s time to add organic compost or a seaweed-based feed.
“The secret is not more work — it’s regular care and observation.” — over years, I’ve learned that a steady, thoughtful routine beats bursts of last-minute effort every time.
5. Troubleshooting While They Grow
Watch closely for common problems:
- Yellow leaves: Can signal too much nitrogen or poor drainage. Adjust fertilizer and check drainage immediately.
- Stunted growth: Often from insufficient light. Move pots to sunnier locations or supplement lighting.
- Pests: Spider mites, aphids, and caterpillars love blackberries. Remove damaged leaves, spray with insecticidal soap, and encourage beneficial insects like ladybugs.
- Wilting: Could mean underwatering or root damage. Check soil moisture and inspect roots if you repot.
- Mildew or fungal spots: Ensure airflow by pruning and avoid overhead watering.
Quick fixes keep your plants strong and productive. Don’t wait until problems multiply. Regular observation is your best defense.
6. Harvesting
Your first berries will ripen about 70–90 days after planting, depending on the variety and conditions. Look for a rich, deep black color (no red patches), a glossy finish, and a plump, slightly soft texture when gently squeezed. Ripe berries pull away with minimal resistance and emit a sweet, fruity aroma.
To enhance flavor, reduce watering the week before harvest — this concentrates sugars. When picking, handle gently to avoid bruising; the ripe berries will fall off easily with a soft tug or gentle twist.
Store harvested blackberries in a cool, dark place at about 4–7°C (39–45°F). They last up to 2 weeks when kept dry and ventilated. For longer storage, freeze berries spread thinly on trays, then transfer them to airtight containers.
Extra Tips for Perfect Results
- Companion plants: Marigolds deter pests; lavender attracts pollinators; nasturtiums trap aphids; mint repels unwanted bugs.
- Rotate your pots each season to prevent soil fatigue and pathogen buildup.
- Mulch with straw or dried leaves to retain moisture and suppress weeds.
- Use rainwater for irrigation where possible — tap water can cause soil to harden over time.
- In windy locations, cluster pots together for stability and shared moisture benefits.
- During extreme summer heat, provide a thin fabric shade during the brightest midday hours to protect your plants.
Common Mistakes and How to Fix Them
- Overwatering: Roots become soft and rot. Solution: let the top 2 cm (1 in) of soil dry out before watering again.
- Weak growth: Insufficient sunlight. Fix: move pots to a sunnier spot with 6–8 hours of direct sunlight daily.
- Yellow leaves: Excess nitrogen causing leaf burn. Use fertilizer higher in phosphorus, lower in nitrogen.
- Poor germination: Planting seeds too deep. Sow at 0.5–1 cm (¼–½ in) depth only.
- Misshapen roots: Compacted soil prevents healthy growth. Mix in coarse sand or perlite for better aeration.
Harvest and Storage
Harvest blackberries gently by grasping each ripe fruit and pulling it with a slight twist — the perfect berry detaches easily, leaving stems intact. Avoid tugging hard to prevent damage to the plant’s delicate canes.
Store your fruit in a dark, cool environment at a temperature of around 4–7°C (39–45°F), with moderate humidity to prevent shriveling or mold. Under these conditions, berries last up to 2 weeks.
If you want to preserve berries longer, consider pickling in sugar syrup, drying them for homemade fruit leather, or freezing. When freezing, spread the berries in a single layer on a baking sheet first — this keeps them from clumping.
Also, save seeds by allowing some berries to overripen, then mash and rinse the pulp off. Dry the seeds on paper towels before storing them in a cool, dark place for next year’s planting.
What Success Looks Like
When you pull your first firm, fragrant blackberry from the pot, you’ll feel a quiet satisfaction — proof that your consistent care and attention have paid off. Expect to harvest about 1–2 kg (2–4 lb) per container over the season, depending on variety and conditions.
The sensation of cool, juicy berries bursting with balanced sweetness and sharpness on your tongue is one few store-bought fruits can match. The real reward isn’t just the fruit; it’s the connection you build with the plants as they grow, bloom, and bear fruit under your hands.
Mini Recap — Your Success Checklist
- Pot depth: at least 30 cm (12 in).
- Soil mix: 70% loam, 20% compost, 10% sand or perlite.
- Watering: 2–3 times per week, check soil moisture by touch.
- Sunlight: minimum 6–8 hours daily.
- Fertilizer: every 3–4 weeks, low nitrogen.
- Harvest: 70–90 days after planting.
Closing Reflection
Growing blackberries in pots is an enriching journey — not one of perfection but of patience and small, consistent care. Each stage teaches you to read the subtle signals plants give. Watching shoots unfurl, leaves deepen to forest green, and finally the fruit swell heavy on thorny canes connects you to nature in a way few plants do. Don’t rush. Adjust, observe closely, and enjoy the process. That’s what makes you a gardener. Remember, every berry fresh from your pot is a celebration of your effort and connection with the earth.

Hi there — I’m Kyla, the creator behind Kyla Garden Tips 🌿
I’ve always been passionate about plants, flowers, and the simple joy that comes from growing something beautiful. What started as a small balcony garden has turned into a love for helping others create their own green spaces — no matter how big or small.